How to Tie a Tie the Right Way (Without Losing Your Patience)
Learn how to tie a tie step by step without the frustration. Easy knots for beginners plus pro tips to get a perfect, sharp look every time.


Struggling with your tie? Learn how to tie a tie in under five minutes with this simple step-by-step guide. Perfect for beginners, weddings, and interviews.
How to Tie a Tie the Right Way (Without Losing Your Patience)
If you’ve ever stood in front of a mirror, tie in hand, wondering how something so small could cause so much stress — you’re not alone. Tying a tie is one of those life skills everyone assumes you just “pick up,” yet most guys Google it at least once (usually five minutes before a wedding or job interview).
The good news? Learning how to tie a tie isn’t complicated. In fact, once you get the hang of it, you’ll wonder why it ever felt so intimidating.
Today, I’ll walk you through the Four-in-Hand knot — the easiest and most versatile knot for beginners. It looks sharp, works for any occasion, and you can learn it in minutes.
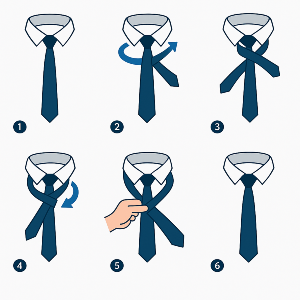
Step-by-Step: The Four-in-Hand Knot
Here’s how to tie it:
- Start with your collar up and the tie draped around your neck.
- The wide end should hang about a foot lower than the narrow end.
- Cross the wide end over the narrow end near your collar.
- Think of it as an “X” forming right below your chin.
- Wrap the wide end behind the narrow end, pulling it back across the front.
- Loop the wide end around the front again.
- At this point, you’ll see the beginnings of a small knot forming.
- Pull the wide end up through the neck loop.
- Feed it down through the loop you’ve just made in front.
- Tighten the knot by holding the narrow end and sliding the knot up gently until it sits snug at the collar.
That’s it. Seven steps, two minutes, zero stress.
Pro Tips for a Sharp Look
- Keep the length right: The tip of your tie should just touch your belt buckle.
- Smooth the dimple: Pinch the fabric just under the knot as you tighten — it creates that classic little crease you see on ties in magazines.
- Practice once or twice before the big day: Trust me, it’s worth it.
When to Use the Four-in-Hand Knot
The Four-in-Hand is the Swiss Army knife of tie knots. It works for:
- Job interviews → simple, neat, professional.
- Weddings → elegant without being flashy.
- Everyday office wear → versatile for any shirt/tie combo.
Later, once you’re comfortable, you can experiment with other knots (like the Windsor for formal events). But start here — it’s the most forgiving and reliable.
Recommended Tie Fashion Suggestions
If you’re just starting out, these beginner-friendly tie options from Walmart are perfect:
- Classic Solid Color Tie – a must-have for interviews and weddings.
- Tie + Tie Clip Bundle – keeps your look sharp and secure all day.
- Silk Tie Starter Pack – versatile colors that match any suit.
👉 These are affiliate links, which means DIYHows may earn a small commission at no extra cost to you — helping us keep producing free, helpful guides like this.

Final Thoughts
Tying a tie isn’t a mystery — it’s just a rhythm you need to get used to. Once you’ve mastered the Four-in-Hand, you’ll never feel that last-minute tie panic again.
And here’s the secret most people won’t tell you: once you’ve tied it a few times, your hands will remember the sequence automatically. From then on, it’ll take you less than a minute to pull off a perfectly polished knot.
So next time you’ve got a big meeting or event, you won’t be Googling frantically — you’ll be the one calmly helping someone else.