How to Make DIY Floating Witch Hats That Will WOW Your Neighborhood (Step-by-Step Guide)
Create magical DIY floating witch hats with this easy, step-by-step guide. Get ready to wow your neighbors this Halloween! Start your spooky project today.


Tired of seeing the same old skeletons and plastic pumpkins every single year? Let's be honest: most store-bought Halloween decorations are either uninspired or way too expensive.
I promise that by following this guide, you’ll be able to create a truly magical, show-stopping Halloween display that looks like it’s straight out of a movie set. And the best part? You can do it on a tiny budget.
In this step-by-step tutorial, I’m going to show you the exact process for making enchanting DIY floating witch hats. We’ll cover the best materials to use, how to make them glow, and the secret to hanging them so they look like they’re actually levitating.
Table of Contents
- Project Overview: What You're Making
- Quick Info: Time, Cost & Difficulty
- Materials and Tools You'll Need
- Step 1: Prepare Your Witch Hats
- Step 2: Add the Magical Glow
- Step 3: Attach the "Invisible" Hanging Line
- Step 4: Hang Your Floating Witch Hats
- The Final Reveal
DIY Budget-Friendly Halloween Decor Ideas for 2025 (New & Easy Craft Tutorials)
"Enjoy this curated video. All rights and credit go to the original YouTube creator."
Project Overview: What You're Making
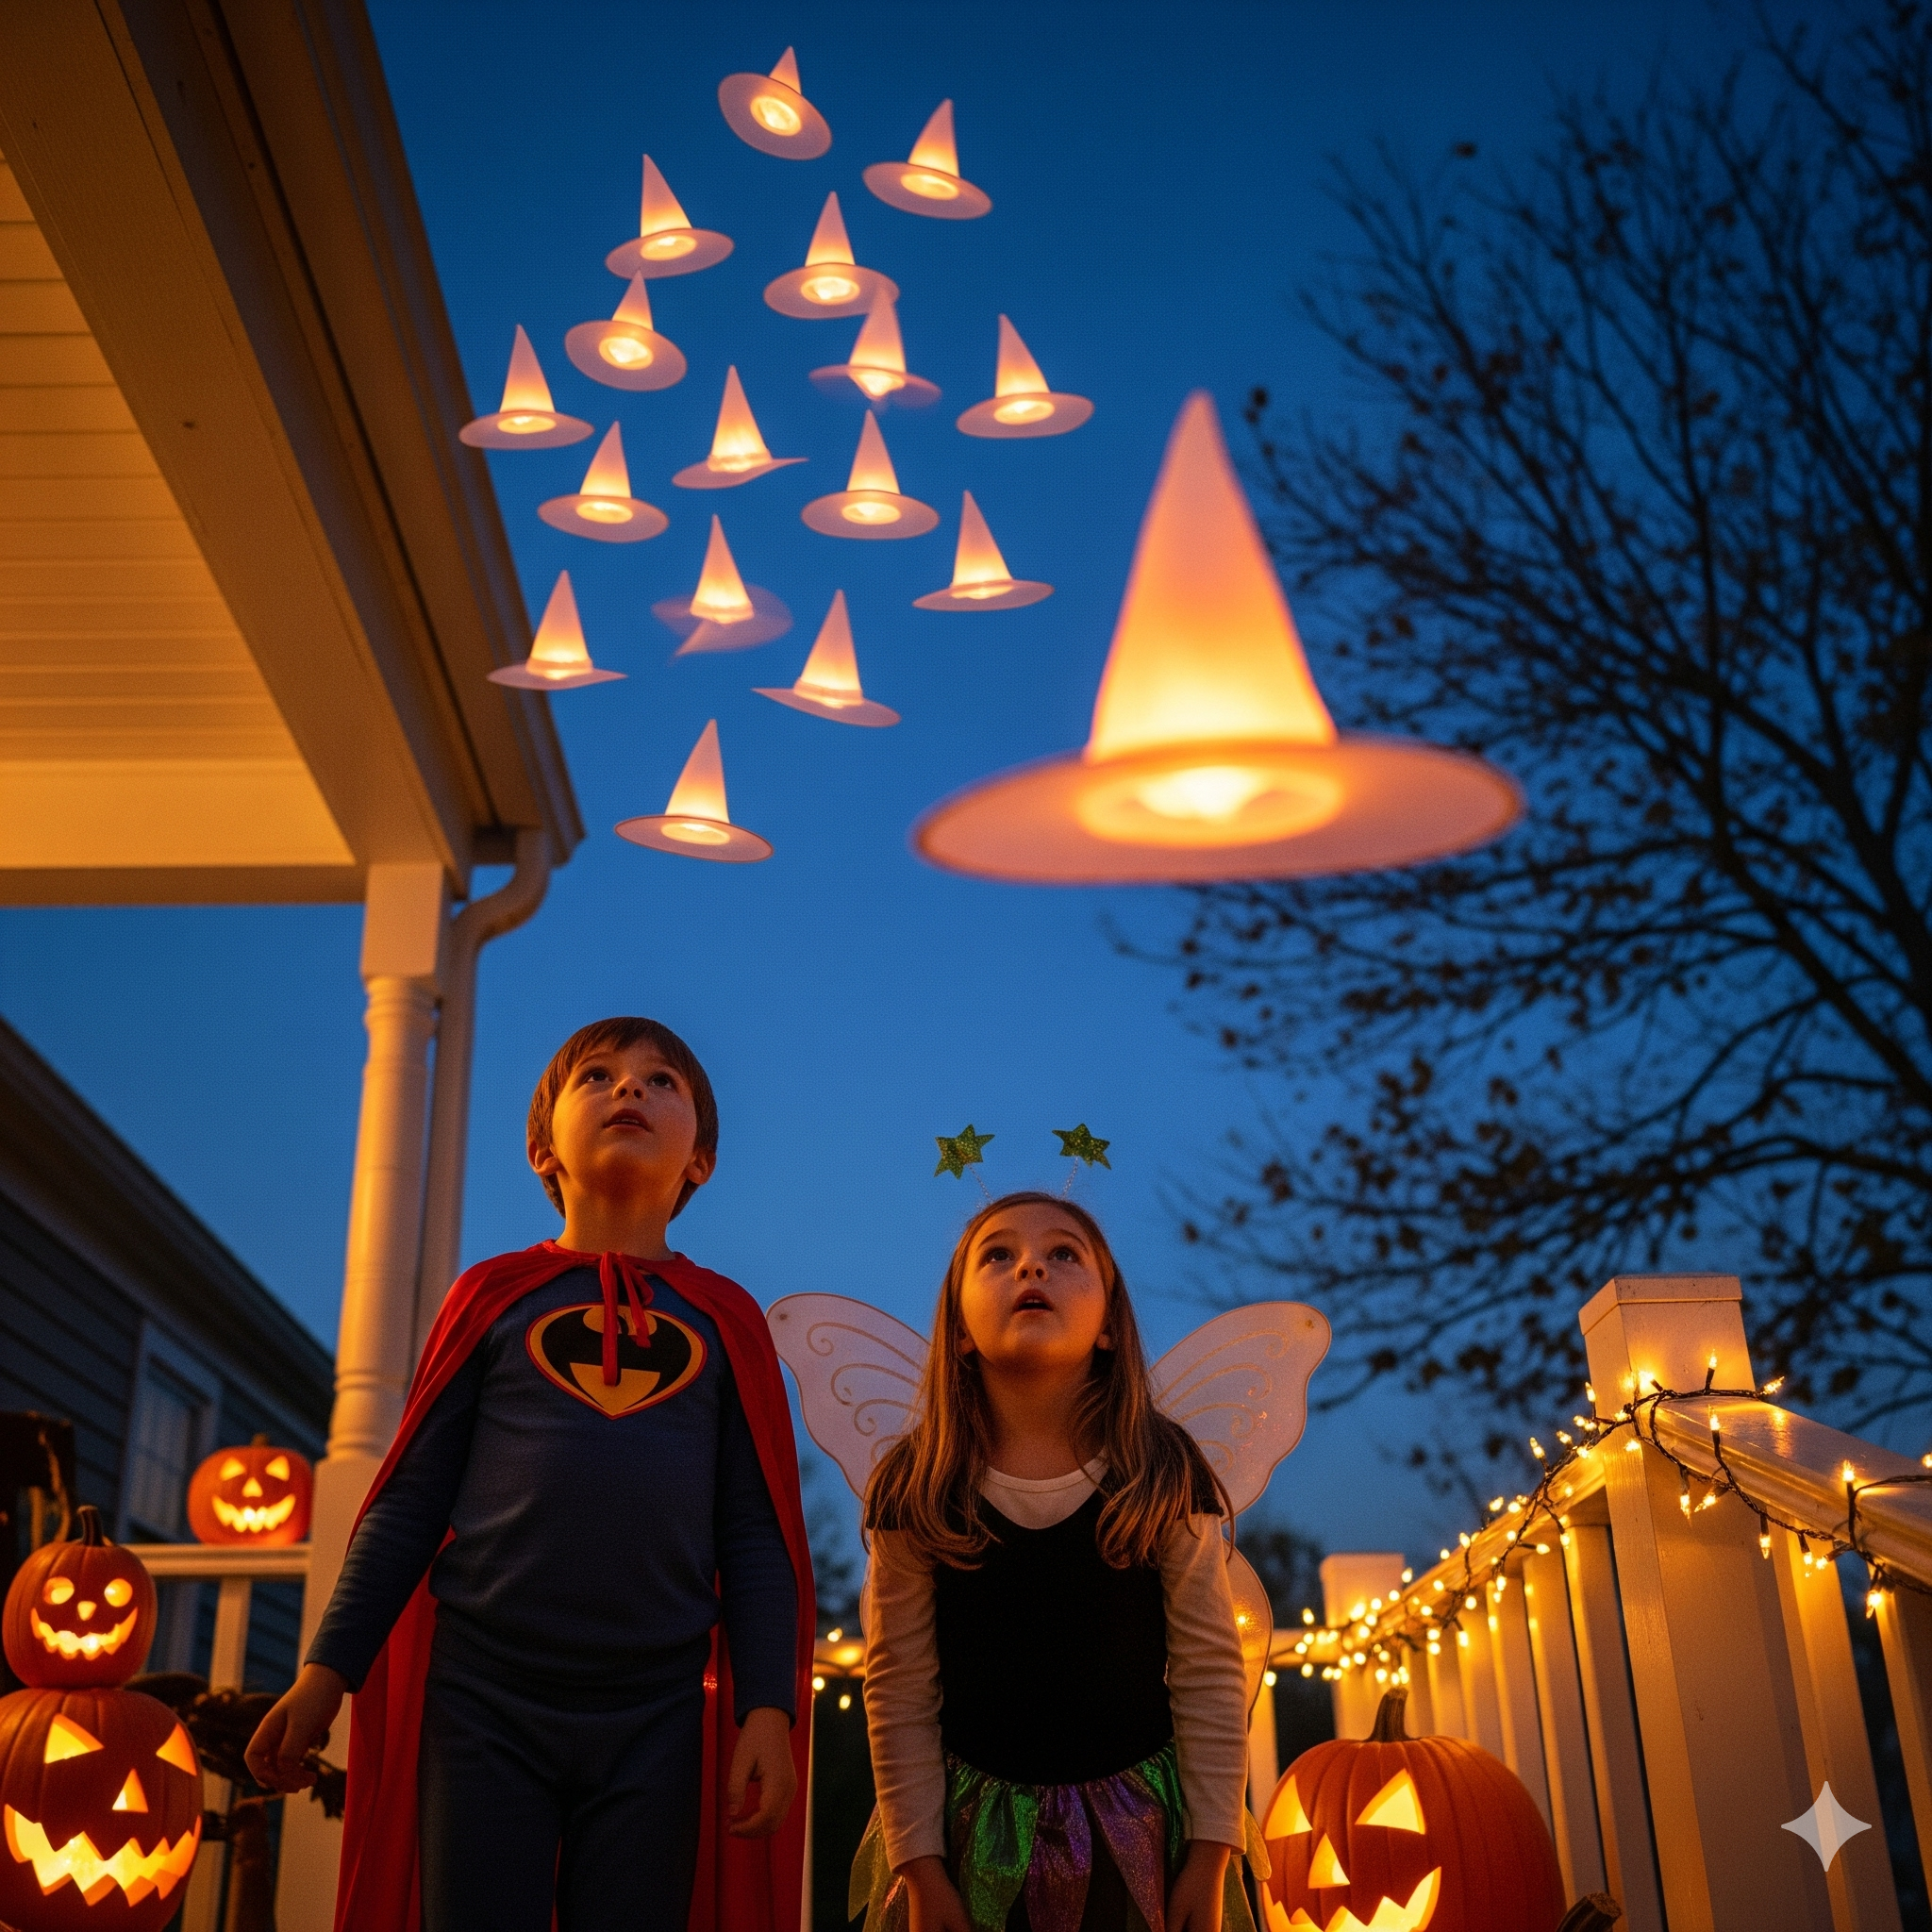
Today, you're going to create one of the most popular and visually stunning Halloween decorations out there: floating witch hats.
This project involves taking simple, inexpensive witch hats and rigging them with LED lights and clear fishing line. When hung from a porch ceiling, tree branch, or even indoors, they create a spooky and mesmerizing illusion of hats floating in mid-air.
It’s an incredibly effective decoration that gets a huge reaction for very little effort.
Project Quick Info
Estimated Time: 1-2 hours
Estimated Cost: $20-$30
Difficulty Level: Beginner
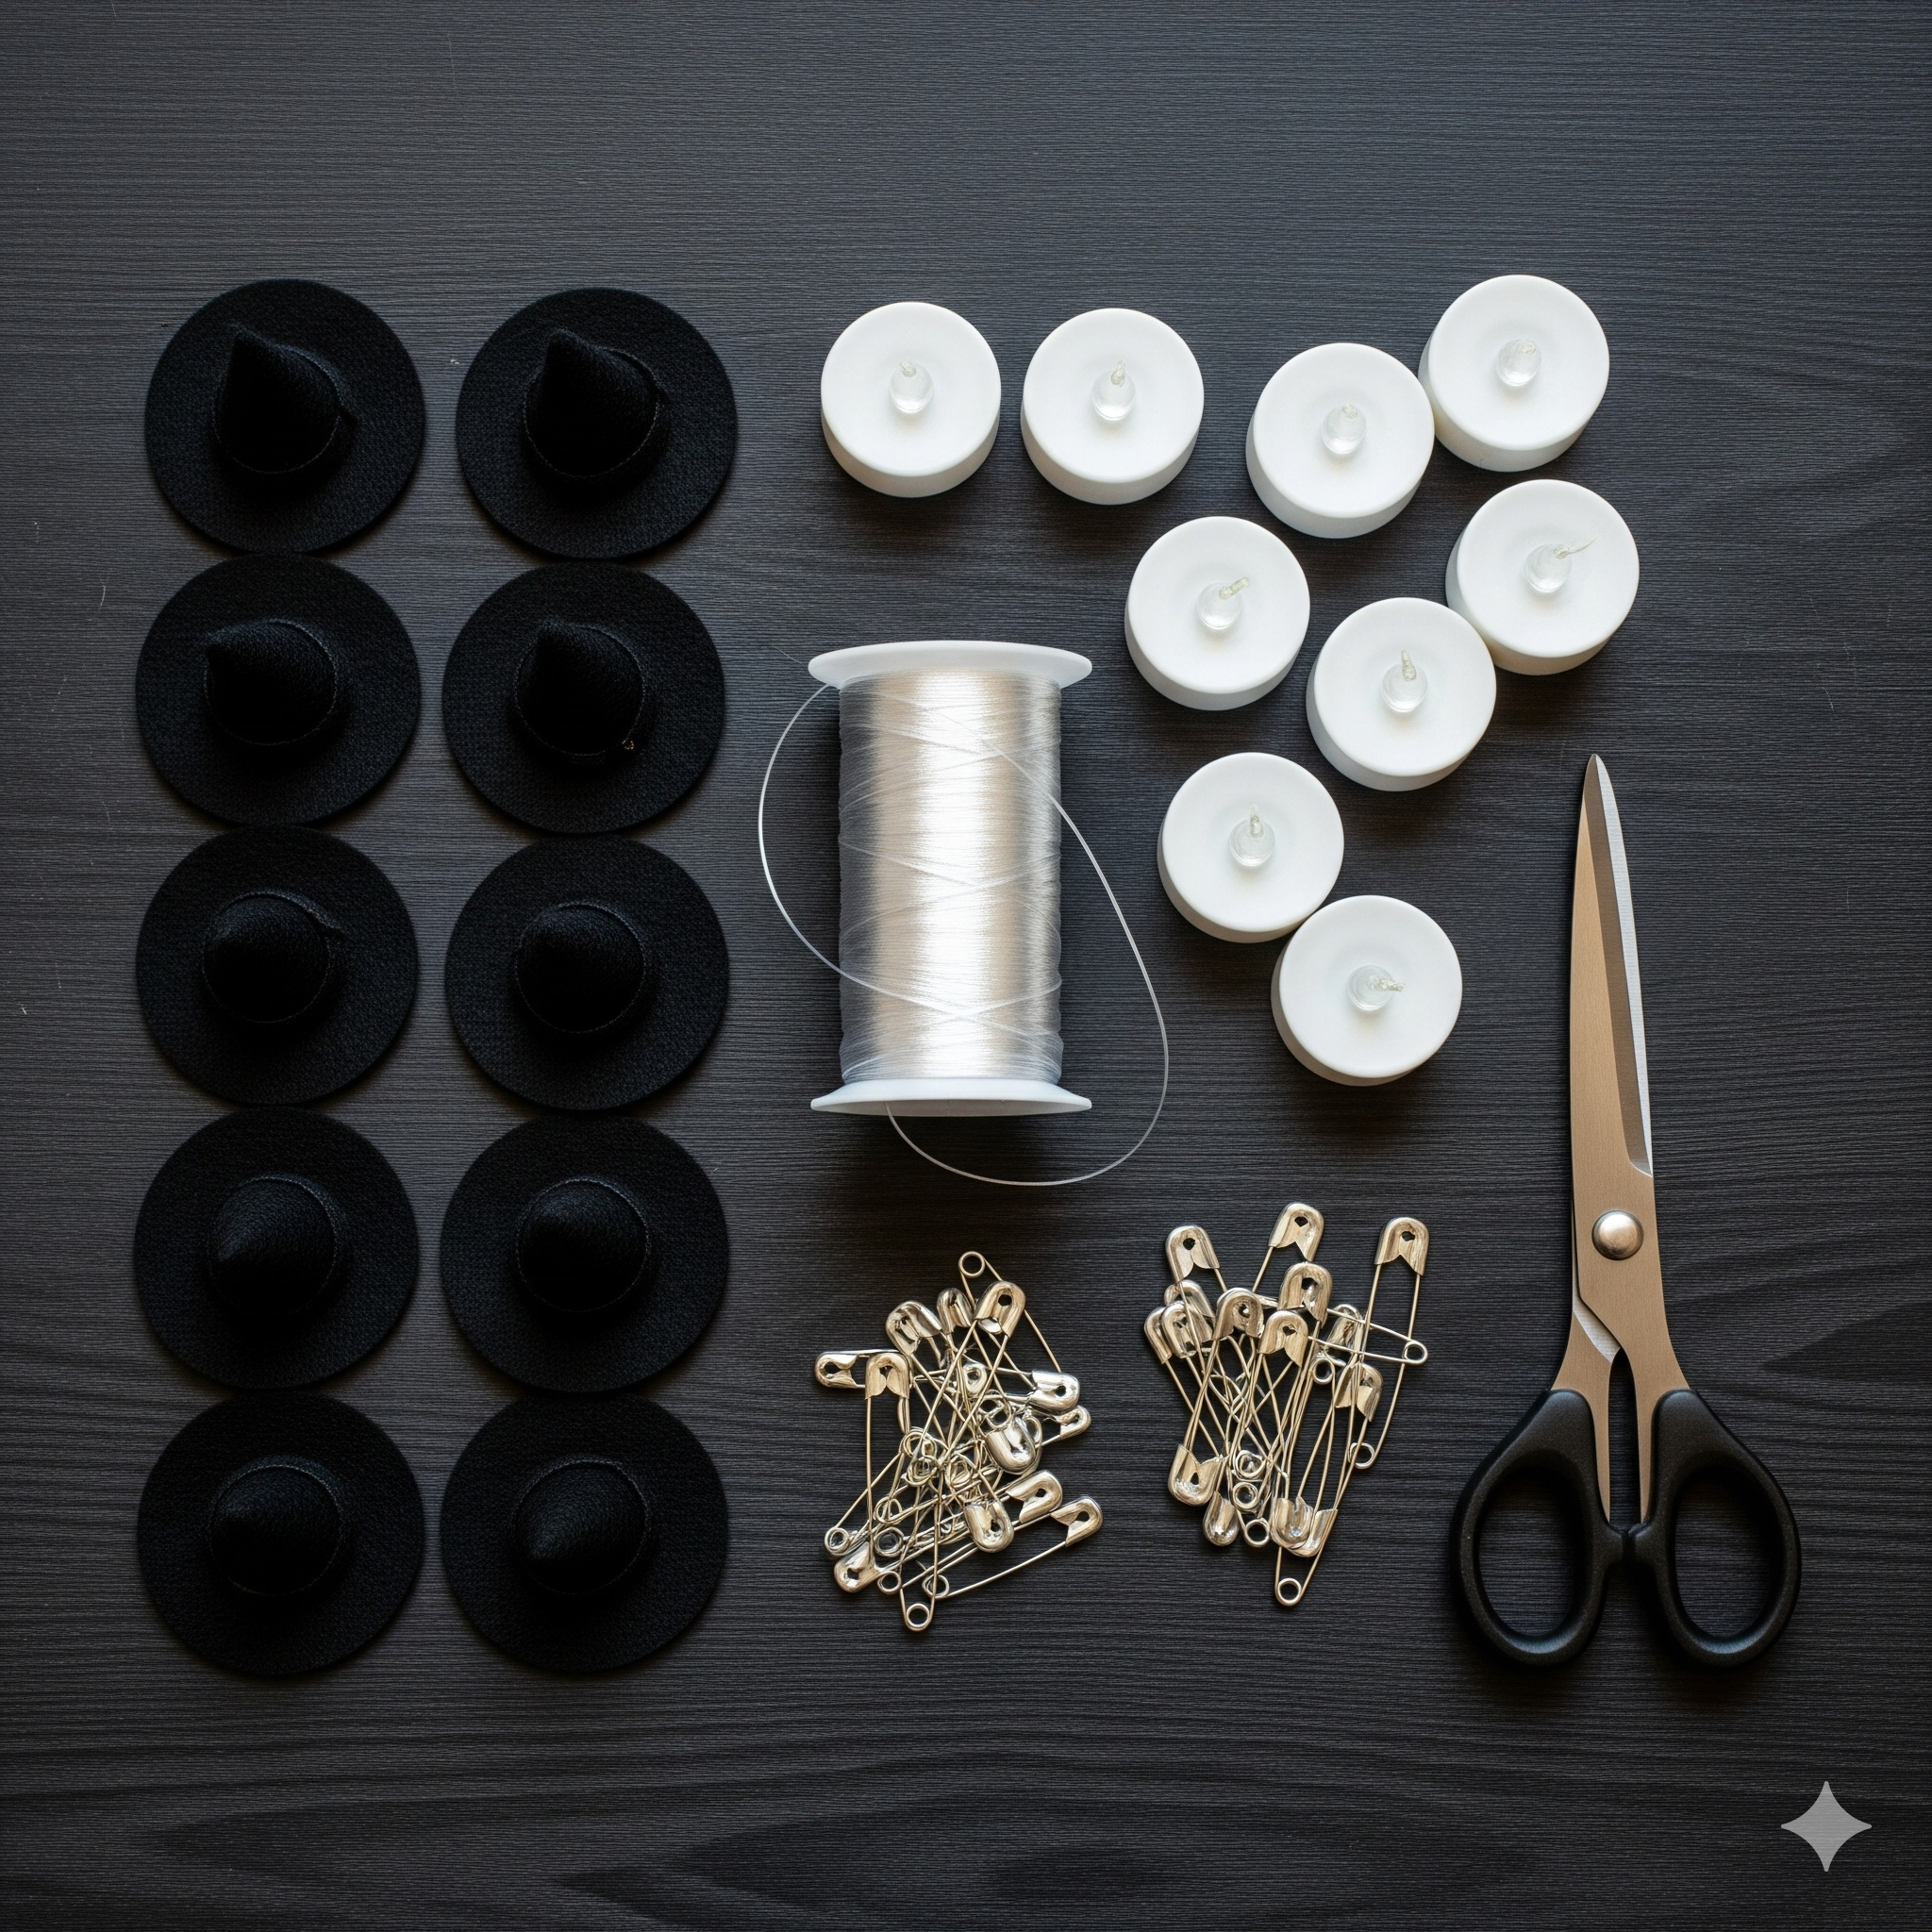
Materials and Tools You'll Need
The key to this project is simplicity. You don't need any special equipment. In fact, you can get most of these items from Walmart or your local craft store.
Materials:
- Witch Hats (6-12): Standard black felt witch hats work best. The more you have, the more dramatic the effect.
- LED Tea Lights (Battery-Operated): One for each hat. Look for ones with a flickering effect for a spookier vibe. Do not use real candles.
- Clear Fishing Line: 20 lb test is strong enough without being too visible.
- Large Safety Pins: One for each hat. These make attaching the lights super easy.
- Batteries: For the LED tea lights.
Tools:
- Scissors: For cutting the fishing line.
- Measuring Tape: To ensure consistent hanging lengths.
- Large Needle (Optional): Can make threading the fishing line through the hat tip easier.
- Step Stool or Ladder: For safely hanging the hats.
Getting into the Halloween spirit is half the fun, isn't it? If you're starting to dream up this year's costumes and spooky decorations, consider visiting Walmart to bring it all to life. You can find everything needed to create a spooktacular display and get the whole family ready for trick-or-treating, all in one easy trip. It's a simple way to gather all your goodies so you can focus on what really matters—making magical Halloween memories!
Shop Walmart for all your Halloween needs.
Step 1: Prepare Your Witch Hats
First things first: let's get the hats ready.
When you buy new witch hats, they often come folded and creased. Your first step is to open them up and shape them.
Spend a few minutes working out any major wrinkles. Bend the wire brim (if yours have one) to give each hat a unique, slightly crooked look. You don't want them to be perfectly uniform—variation is what makes the display look organic and magical.
Set them out in a line on your floor or table to visualize your final arrangement.
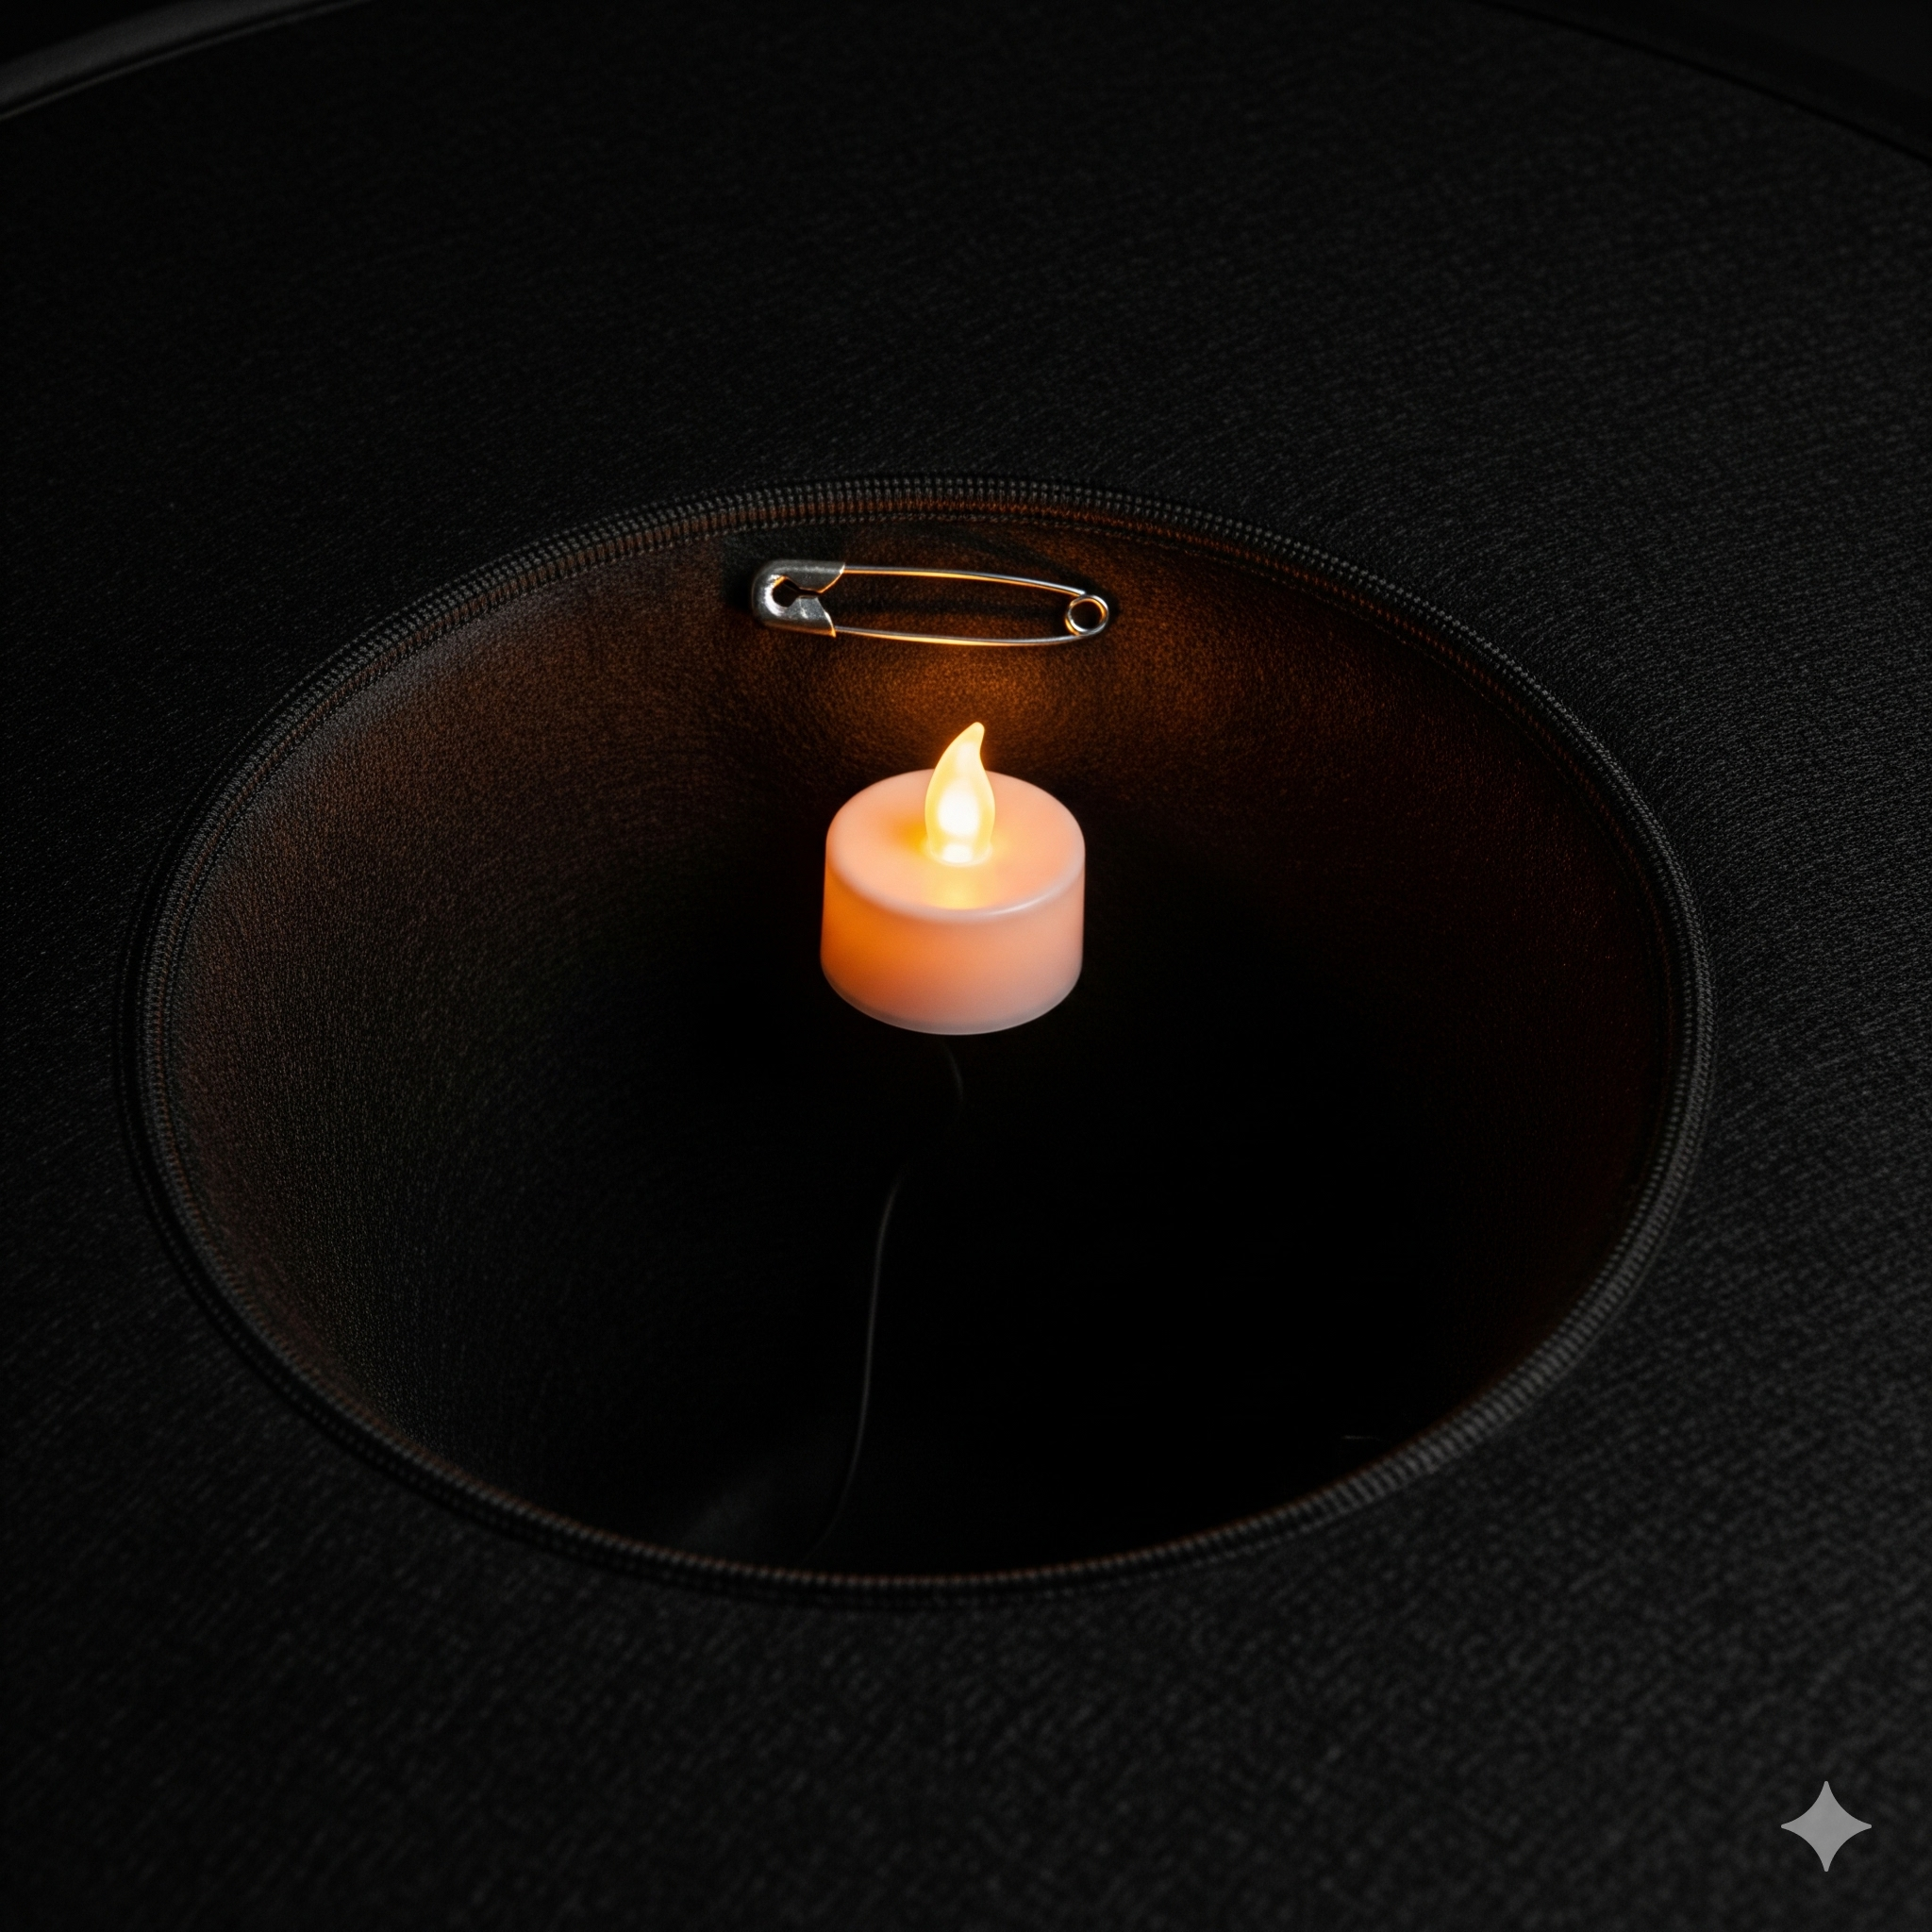
Step 2: Add the Magical Glow
This is where the magic really begins. We’re going to give each hat an eerie, internal glow.
Take one LED tea light and turn it on. Open up one of the large safety pins. Pin the bottom of the LED tea light to the inside center of the witch hat, near the peak.
The safety pin holds the light securely in place so it won't fall out, and positioning it at the top makes the entire hat glow from within.
Repeat this process for every single hat.
Pro-Tip: For an extra layer of spooky, consider using different colored LED lights. A mix of warm white, green, and purple can create a fantastic haunted atmosphere.
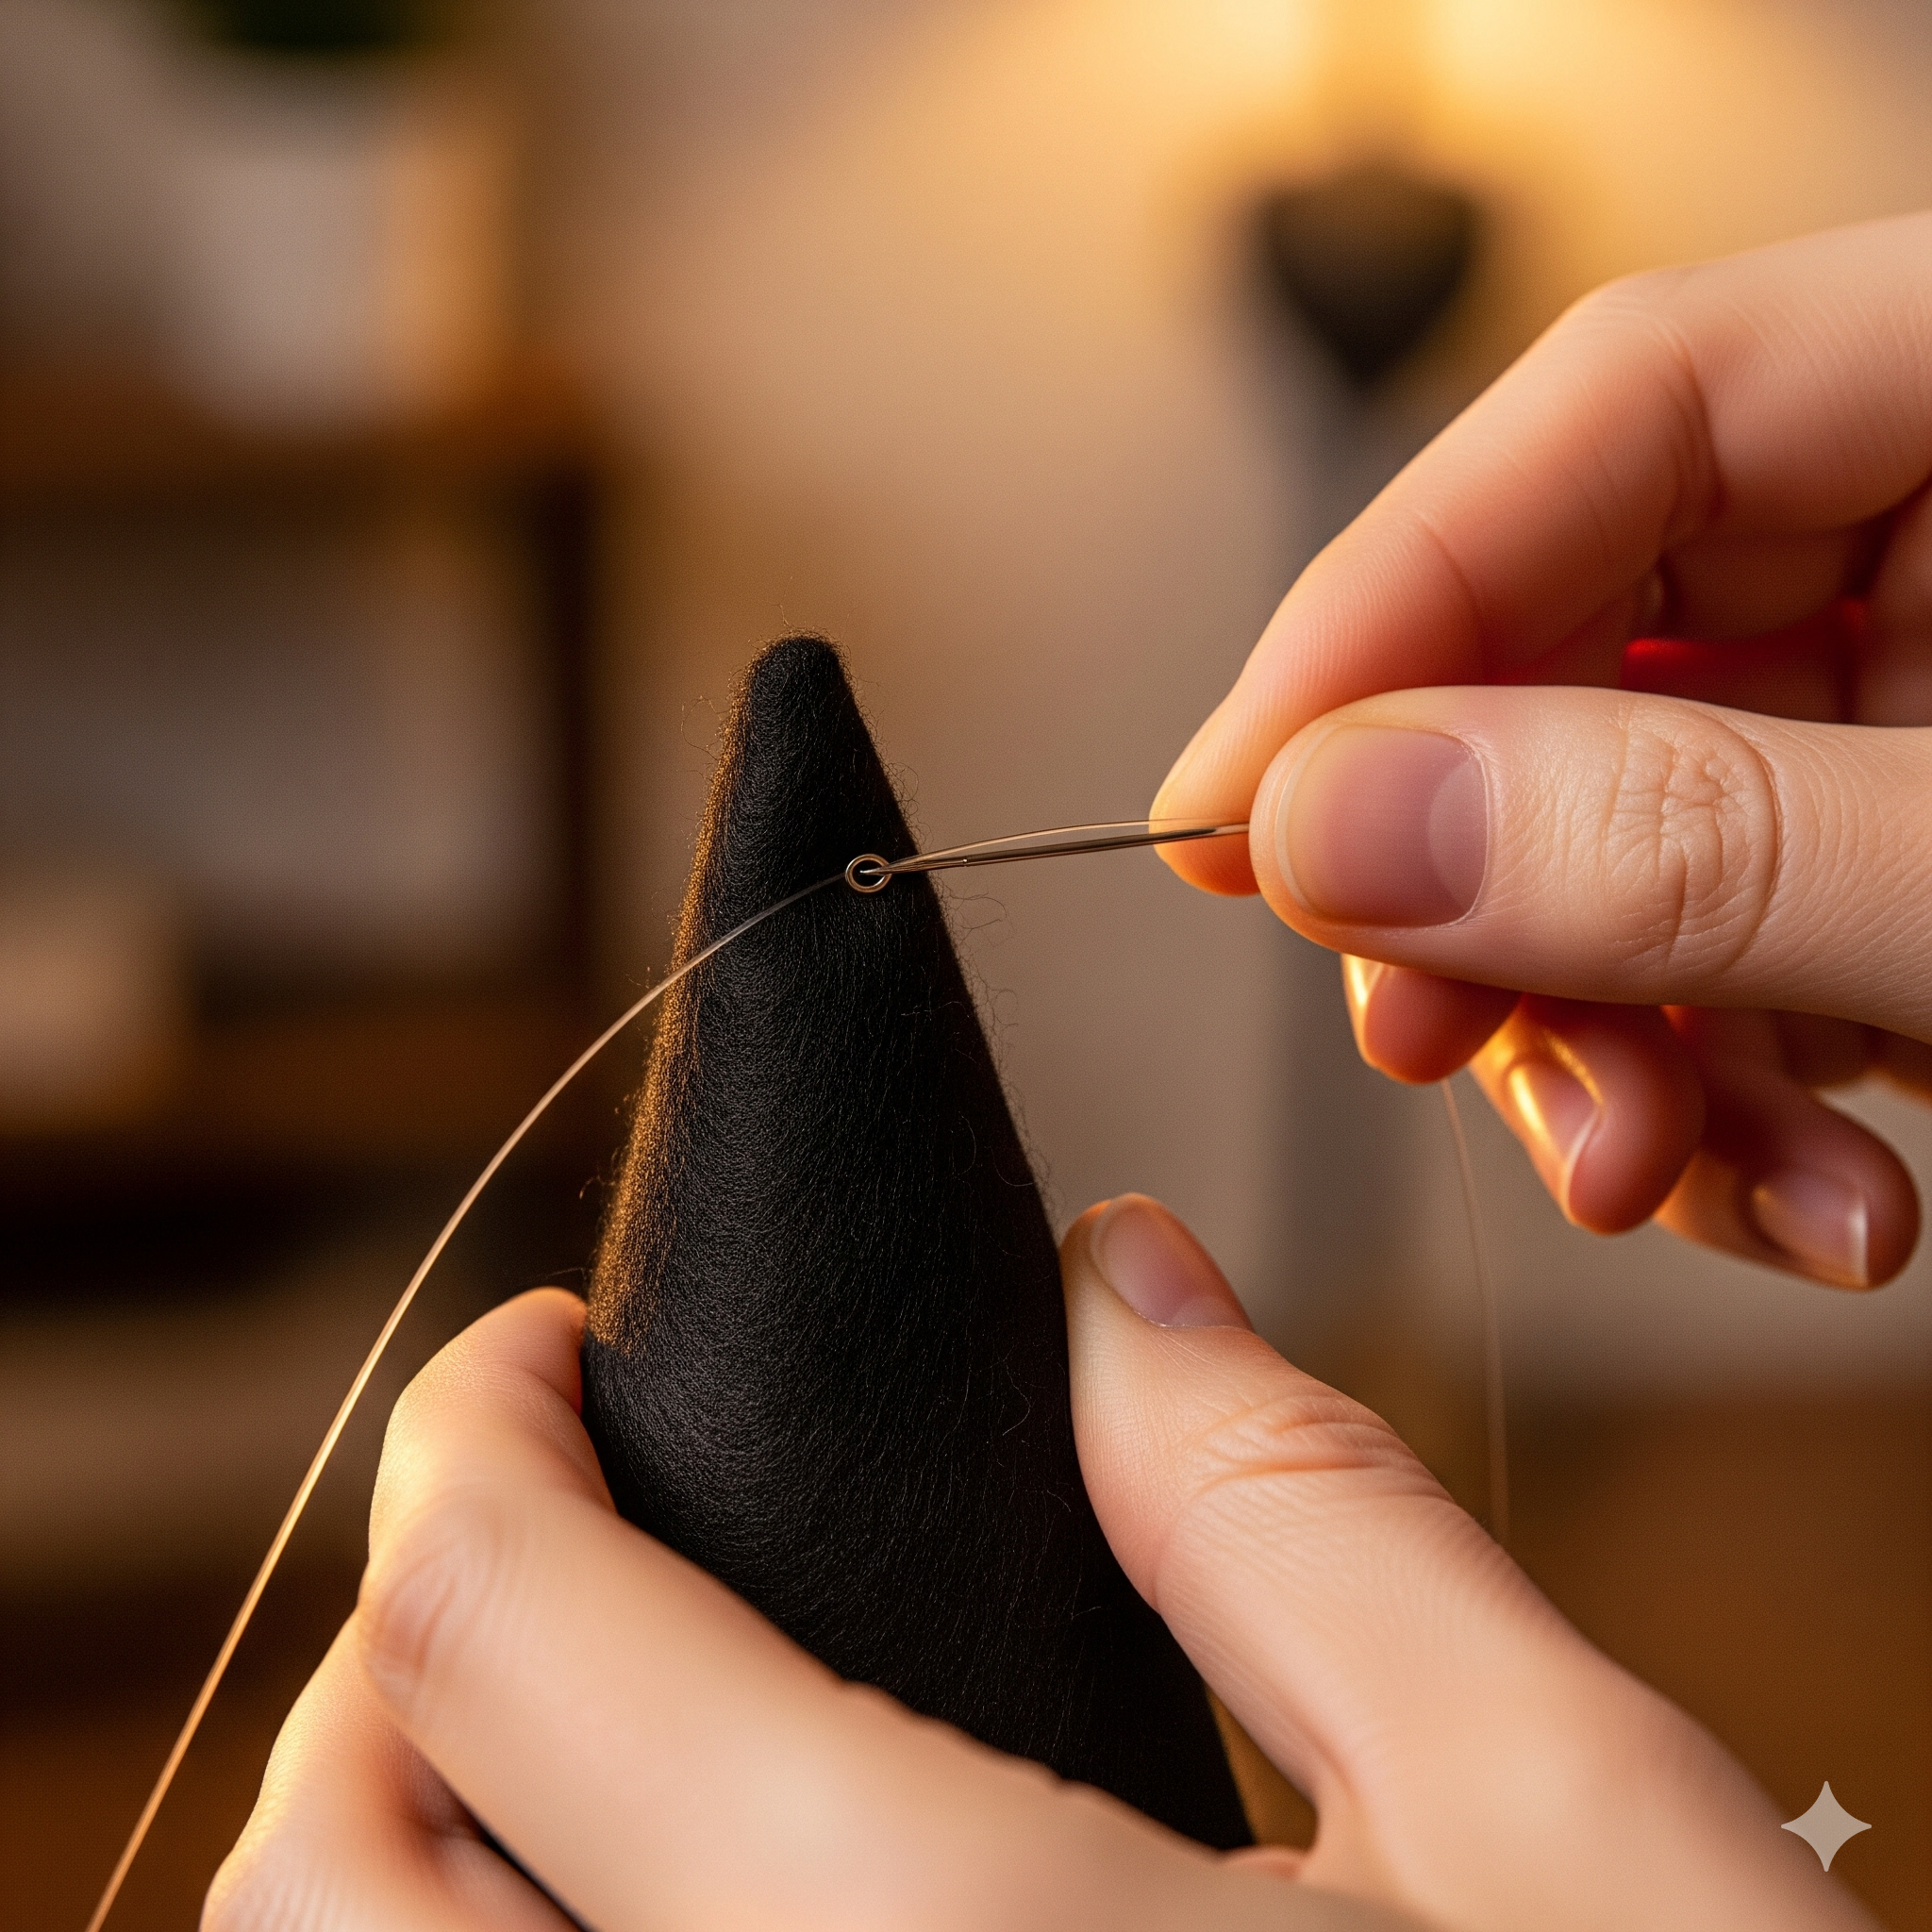
Step 3: Attach the "Invisible" Hanging Line
Now it's time to create the floating illusion. The secret is high-quality, clear fishing line. From a few feet away, it becomes virtually invisible, especially at night.
- Cut Your Line: Decide how far down you want your hats to hang. I recommend varying the lengths to create depth. Cut pieces of fishing line ranging from 2 feet to 4 feet long. Cut one piece for each hat.
- Thread the Hat: Take your first piece of fishing line and thread it through the very tip of the witch hat. You can usually just push it through the felt. If you have trouble, use a large needle to easily poke it through.
- Secure the Line: Tie a secure double or triple knot on the end of the line inside the hat. Give it a gentle tug to make sure it won't pull through the felt. The knot will be hidden inside the tip.
Repeat this for all your hats, using different lengths of fishing line for each one.
Step 4: Hang Your Floating Witch Hats
With your hats prepped and ready, it's time to hang them. The best location is a covered front porch, but you can also hang them from tree branches or even indoors from the ceiling for a Halloween party.
You'll need some way to attach the lines. I recommend using small, clear adhesive hooks (like Command Hooks) or simple cup hooks screwed into the ceiling.
- Plan Your Layout: Before you hang them, decide on the placement. A random cluster often looks best. Start from the back and work your way forward.
- Attach the First Hat: Take your first hat, climb your step stool or ladder, and tie the free end of the fishing line securely to your hook. Let the hat hang and check the height.
- Create Staggered Heights: Hang the next hat at a different height and distance from the first one. Continue hanging all the hats, creating a staggered, multi-layered effect. This is the key to making the display look full and dynamic.
Safety Warning: Always use a sturdy step stool or ladder when hanging decorations. Have someone spot you if possible. For more holiday safety information, check out these excellent Holiday Decorating Safety Tips from the U.S. Consumer Product Safety Commission.
The Final Reveal
Step back and admire your work!
Once the sun goes down, turn on all the LED lights. The hats will appear to be magically floating and glowing in the darkness, creating a spooky and enchanting scene that will stop trick-or-treaters in their tracks.
This project is a perfect example of how simple, inexpensive materials can be transformed into something truly spectacular. It’s an easy win for anyone looking to up their Halloween game.
Now It's Your Turn
You now have everything you need to create your own amazing floating witch hat display.
It’s one of the easiest and most impactful DIY Halloween decorations you can make.
So what are you waiting for? Go grab your supplies and start crafting. And when you’re done, share a photo of your creation in the comments below!
DIY Floating Witch Hats — Frequently Asked Questions
Where is the best place to hang the floating witch hats?
The ideal location is a covered front porch because it protects the hats from the worst of the weather and provides an easy structure to hang them from. You can also hang them from tree branches in your yard or indoors from a high ceiling for a party.
How do I keep the hats from blowing away in the wind?
While the hats will naturally move in a light breeze (which adds to the effect!), you can reduce excessive movement by adding a small weight inside each hat. A couple of washers or a small stone hot-glued to the inside brim can help stabilize them in stronger winds.
What kind of lights work best inside the hats?
Battery-operated LED tea lights are the best and safest option. Look for ones with a built-in timer or a remote control to make turning them on and off much easier. Flickering flame LEDs add a great spooky effect. Never use real candles or any light source that produces heat.
Can I make these waterproof for heavy rain?
Most inexpensive felt hats are not waterproof and can become misshapen if soaked. To make them weather-resistant, you can spray them thoroughly with a waterproofing fabric spray, like Scotchgard, before adding the lights. Allow them to dry completely before hanging.
How do I store the decorations after Halloween?
First, remove the batteries from the LED lights to prevent corrosion. The best way to store the hats is to stack them inside one another and place them in a large plastic bin. This will help them maintain their shape for next year. Wind the fishing line around a piece of cardboard to keep it from tangling.
Is this project safe for kids to help with?
Absolutely! Most of the steps are very kid-friendly. Children can help shape the hats and attach the LED lights with the safety pins. An adult should handle any tasks involving needles, scissors, or climbing a ladder.
How far apart should I hang the hats?
There's no single rule, as it depends on your space. A good starting point is about 1 to 2 feet apart. The key is to create a clustered, random look rather than a perfect grid. Overlap them slightly at different heights to create a sense of depth and make the display look fuller.