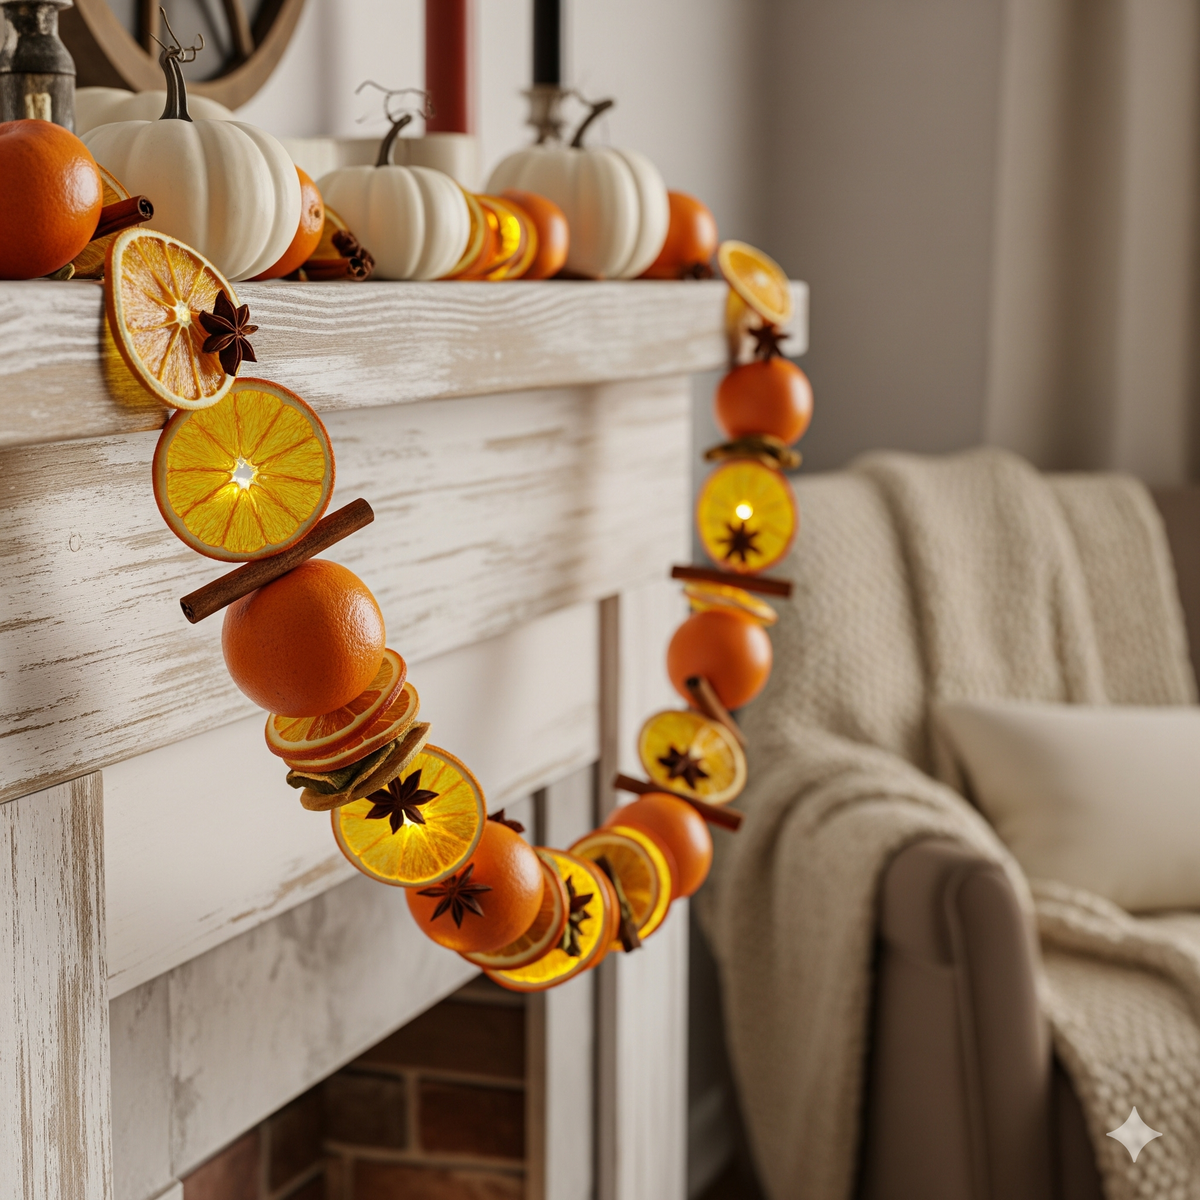
How to Make a Dried Orange Garland: A Step-by-Step Guide for Stunning Fall Decor
Create a stunning DIY dried orange garland! This step-by-step guide reveals the secret to perfectly dried, vibrant orange slices for beautiful fall decor.

Tired of the same plastic pumpkins and synthetic fall decor you pull out year after year? You’re not alone. So many of us crave a more natural, authentic, and cozy aesthetic for our homes, but assume it’s too difficult or expensive to achieve.
I promise you this: you can create breathtakingly beautiful, natural fall decor with just a few oranges and an afternoon. This guide will give you the foolproof, step-by-step blueprint to craft a stunning dried orange garland that not only looks incredible but also makes your home smell like a warm, autumn paradise.
We’ll cover the single most important slicing tip for a professional look, the exact oven temperature to get that perfect translucent glow (without any burning!), and creative ways to customize your garland to make it uniquely yours.
DIY Dried Orange Garland Tutorial: The Easiest Way to Make Fall and Holiday Decor
"Enjoy this curated video. All rights and credit go to the original YouTube creator."
Table Of Contents
- Quick Info: Dried Orange Garland
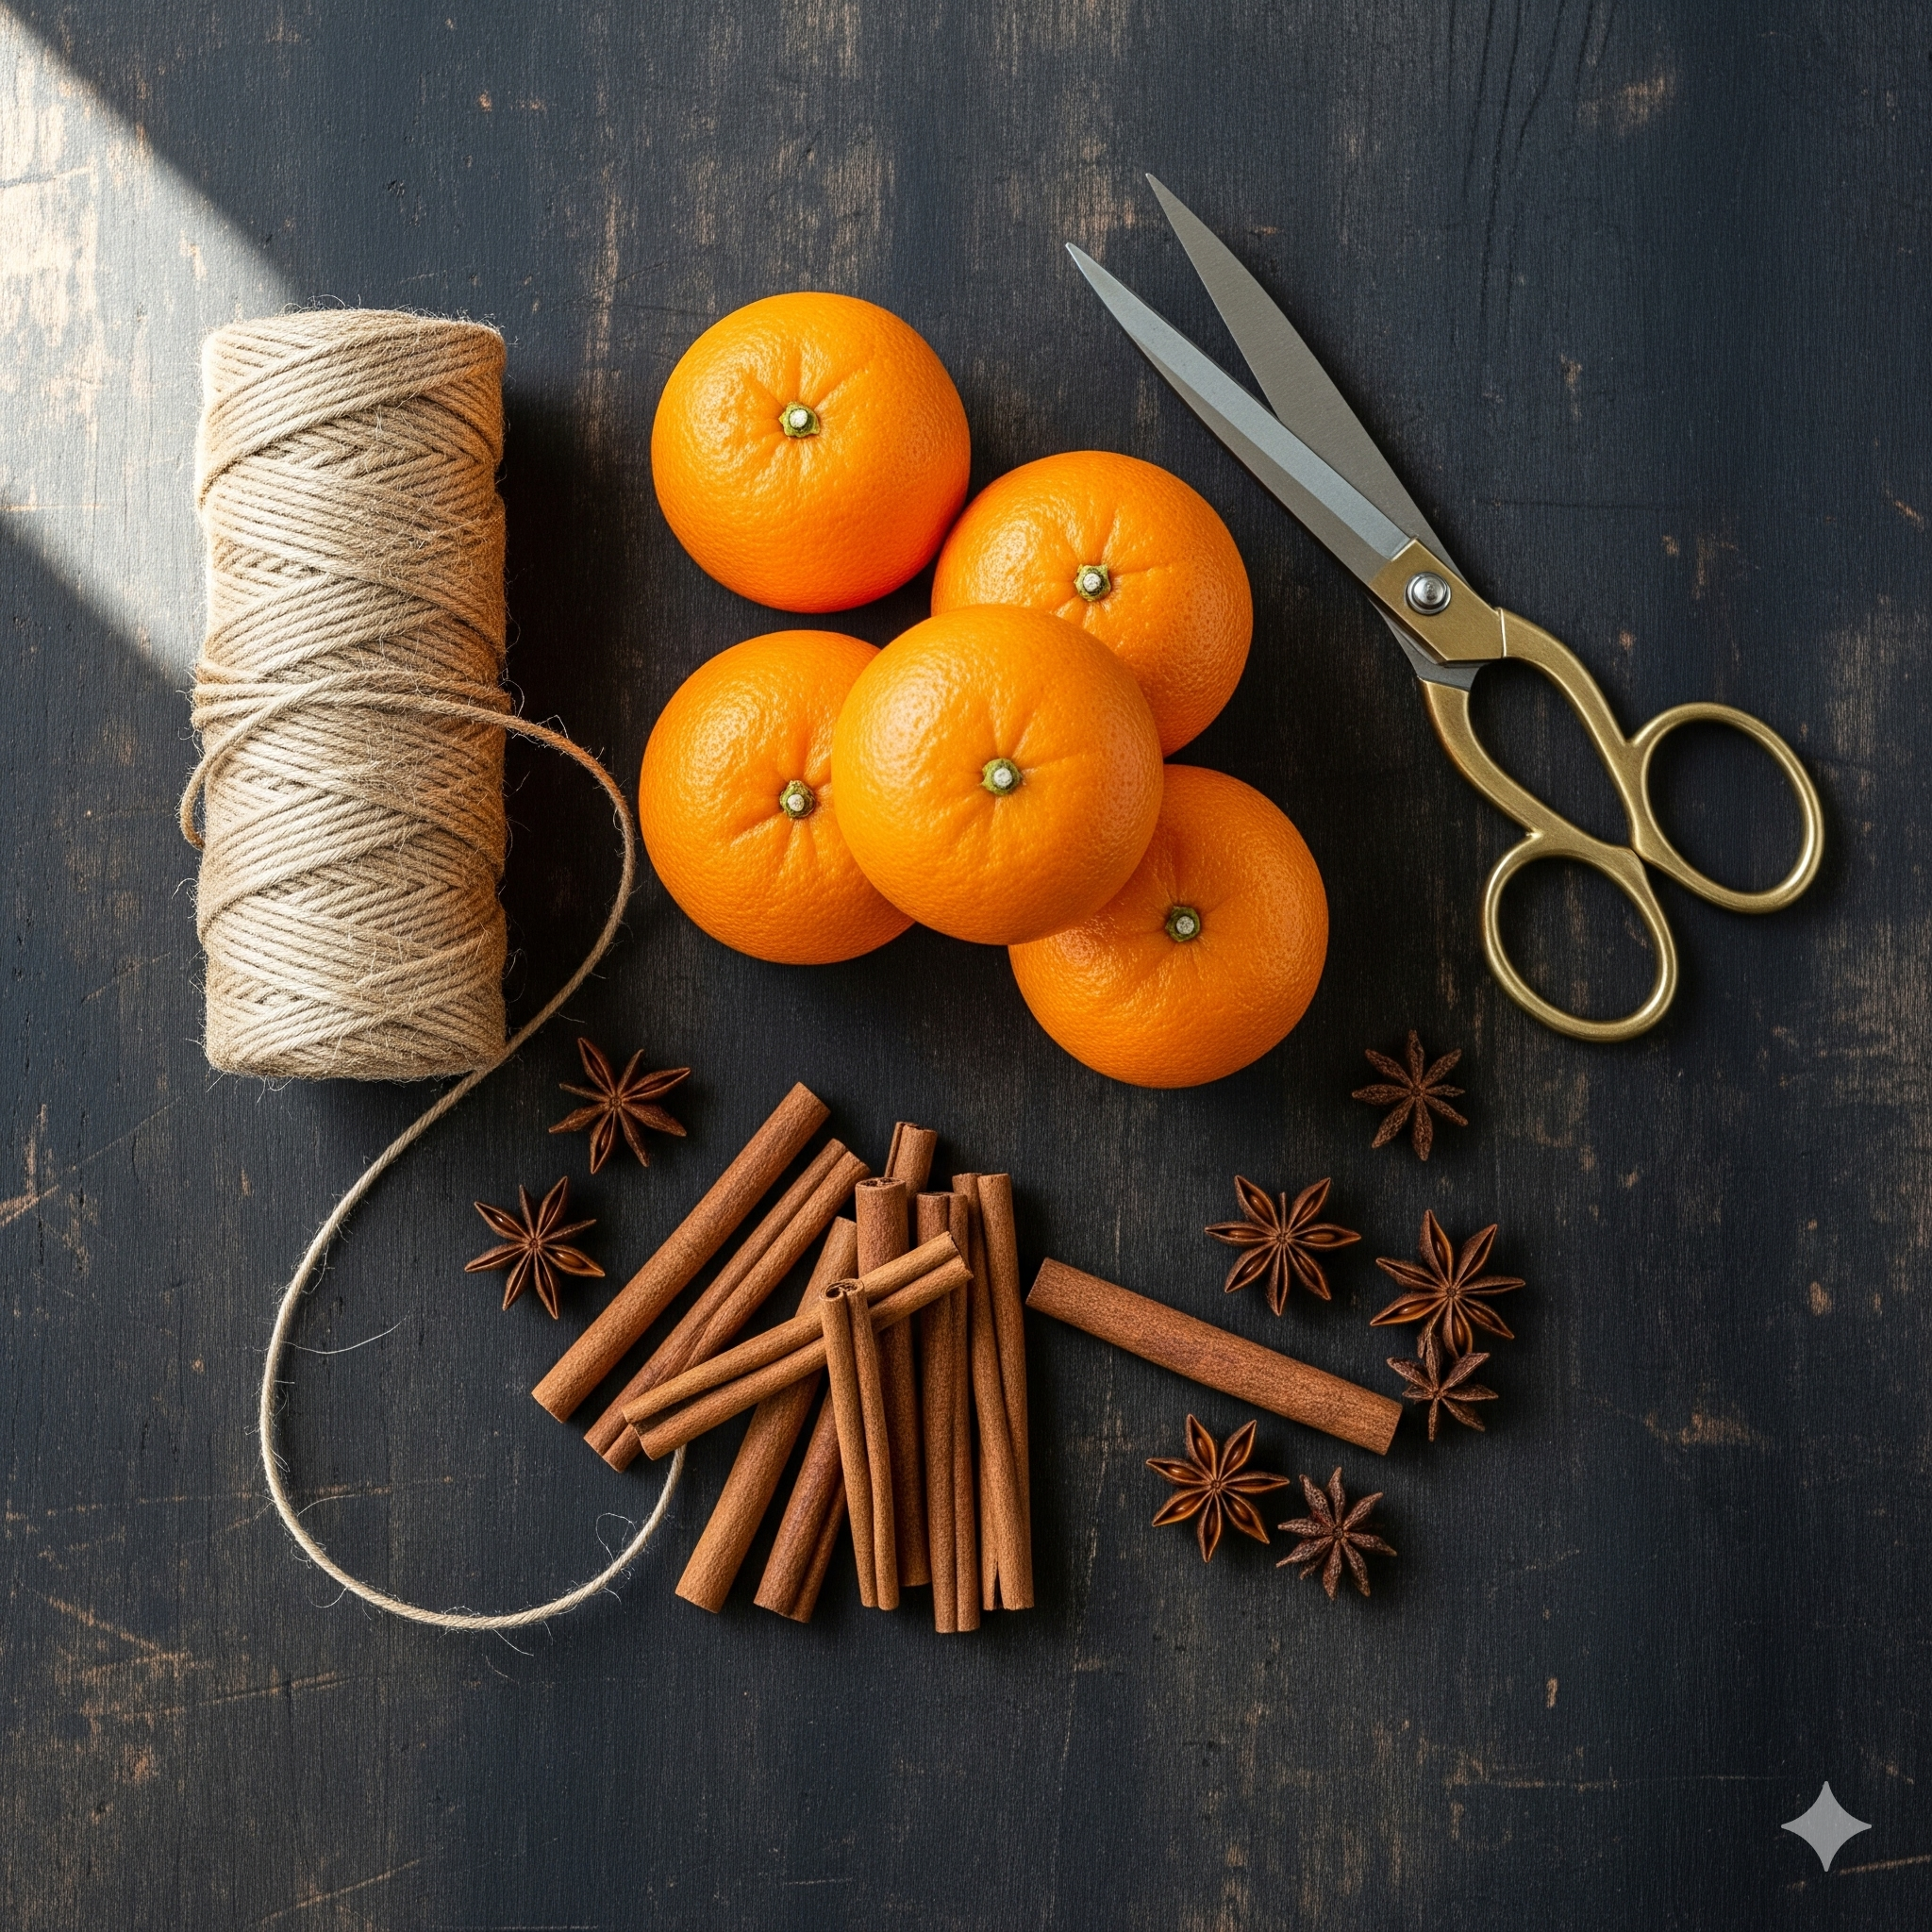
- Materials & Tools You'll Need
- Step 1: Slice and Prepare Your Oranges
- Step 2: Bake the Slices (The Low-and-Slow Method)
- Step 3: String Your Beautiful Garland
- Step 4: Customize and Embellish Your Creation
- Troubleshooting Common Issues
- Your Home's New Favorite Fall Accent
Quick Info: Dried Orange Garland
| Category | Details |
| Estimated Time | 3-4 hours (mostly passive baking time) |
| Estimated Cost | $10-$15 |
| Difficulty Level | Beginner |
Materials & Tools You'll Need
The beauty of this project is its simplicity. You likely have most of these items in your kitchen already.
Materials:
- Oranges: 3-4 medium to large navel oranges are a great start. Navel oranges work best as they are typically seedless and have a thick rind.
- Parchment Paper: Essential for preventing sticking.
- Twine or Jute: For stringing the garland. You can also use fishing line for a "floating" look.
- Optional Embellishments:
- Whole Cranberries (fresh)
- Cinnamon Sticks
- Bay Leaves
- Star Anise
- Wooden Beads
Tools:
- Sharp Knife or Mandoline: A sharp serrated or chef's knife works well. A mandoline will give you perfectly uniform slices.
- Cutting Board
- Baking Sheets (2)
- Paper Towels
- Large Needle (Darning Needle) or Skewer: To easily thread the twine.
Shop Walmart for all your DIY project materials for the best deals
Step 1: Slice and Prepare Your Oranges
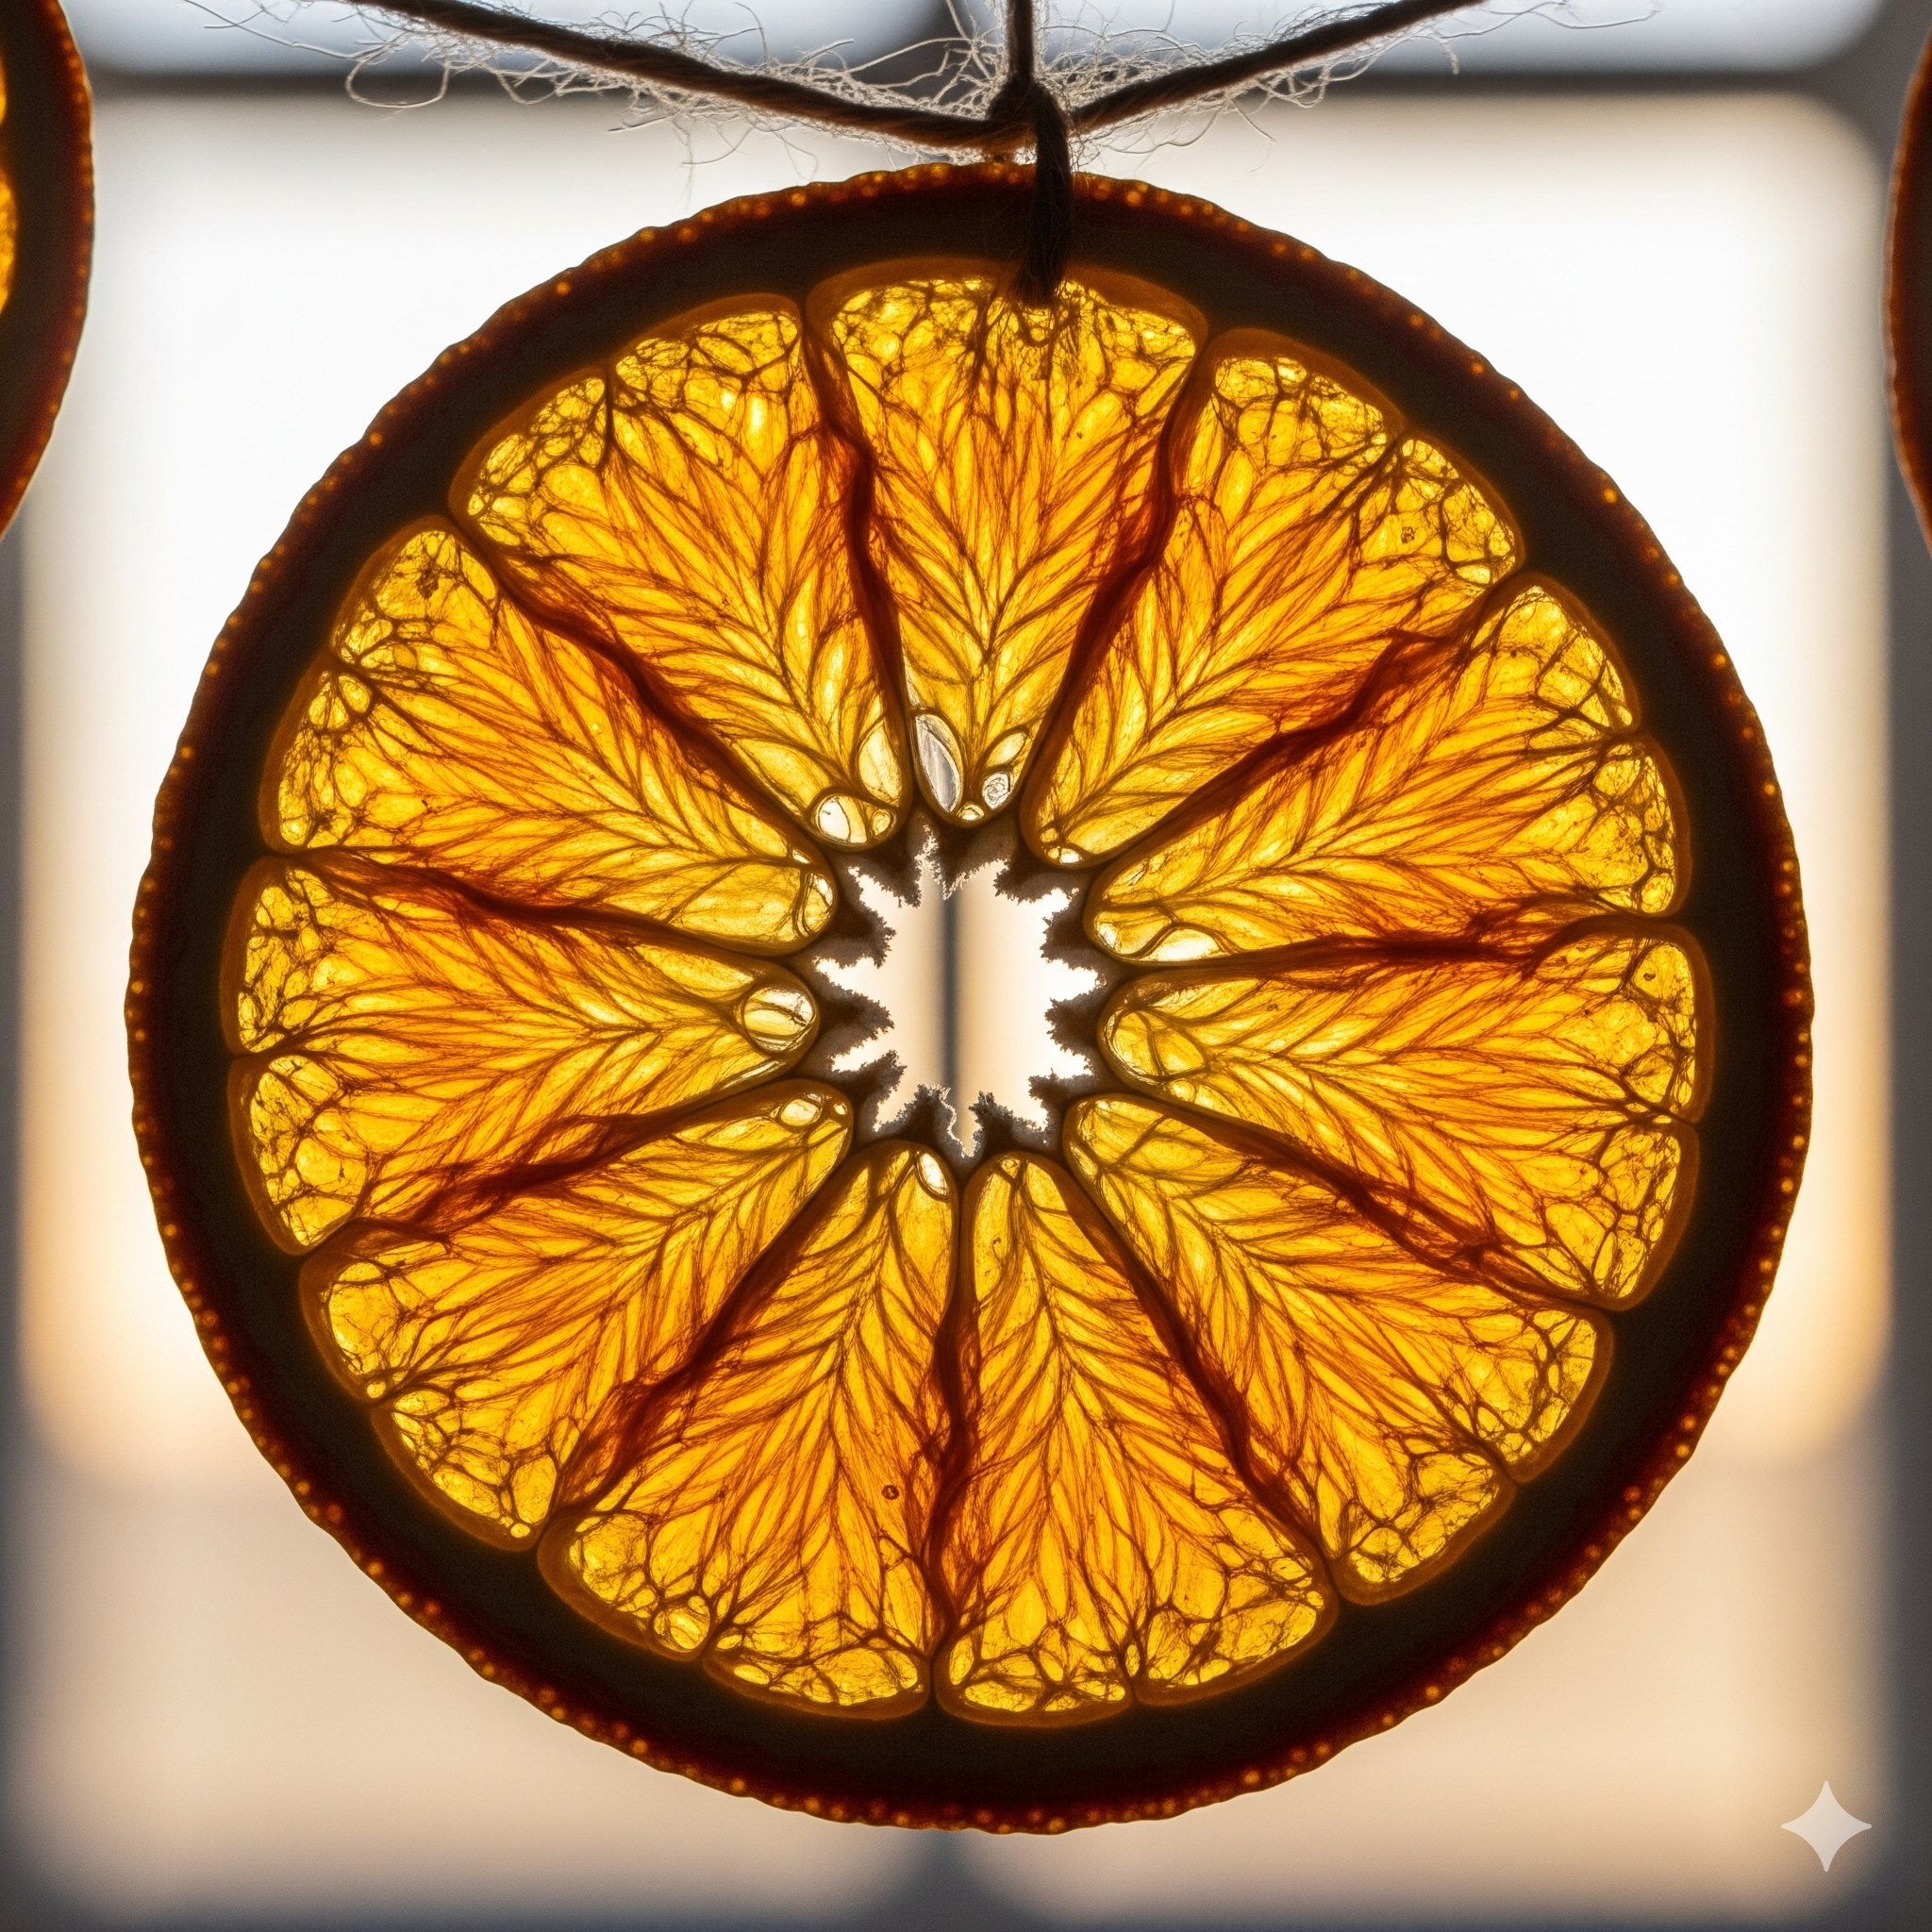
This is the most crucial step for achieving that beautiful, stained-glass look.
First, wash and thoroughly dry your oranges. You don't want any excess moisture on the outside.
Next, place an orange on its side on your cutting board. Using a very sharp knife or a mandoline, slice the orange into rounds that are 1/4-inch (about 6mm) thick. Consistency is key here. Slices that are too thin will burn easily, and slices that are too thick will take forever to dry and may remain sticky.
Pro-Tip: For perfectly uniform slices, use a mandoline slicer. Set it to 1/4-inch, use the safety guard, and you'll have a pile of identical slices in seconds. This is the secret to a professional-looking garland.
Once all your oranges are sliced, lay the rounds on a layer of paper towels. Place another layer of paper towels on top and press down firmly. This blots away a significant amount of excess juice, which dramatically speeds up the drying process.
Step 2: Bake the Slices (The Low-and-Slow Method)
Patience is your best friend in this step. Rushing the process with high heat will result in burnt, dark brown slices instead of vibrant, glowing orange ones.
- Preheat Your Oven: Set your oven to its lowest temperature, typically around 200°F (or 95°C).
- Arrange the Slices: Line your baking sheets with parchment paper. Arrange the blotted orange slices in a single layer, making sure none of them are overlapping.
- Bake and Flip: Place the baking sheets in the oven. Let them bake for 2.5 to 4 hours. To ensure they dry evenly, flip each slice every 45 minutes.
- Check for Doneness: The slices are done when they are dry to the touch, slightly pliable (like leather), and not at all sticky. The color should be a deep, vibrant orange, not brown.
Safety Warning: Do NOT be tempted to increase the oven temperature to speed things up. The goal is to dehydrate the oranges, not cook them. High heat will caramelize the sugars and burn the fruit.
Let the slices cool completely on the baking sheet before moving on to the next step. They will crisp up a bit more as they cool.
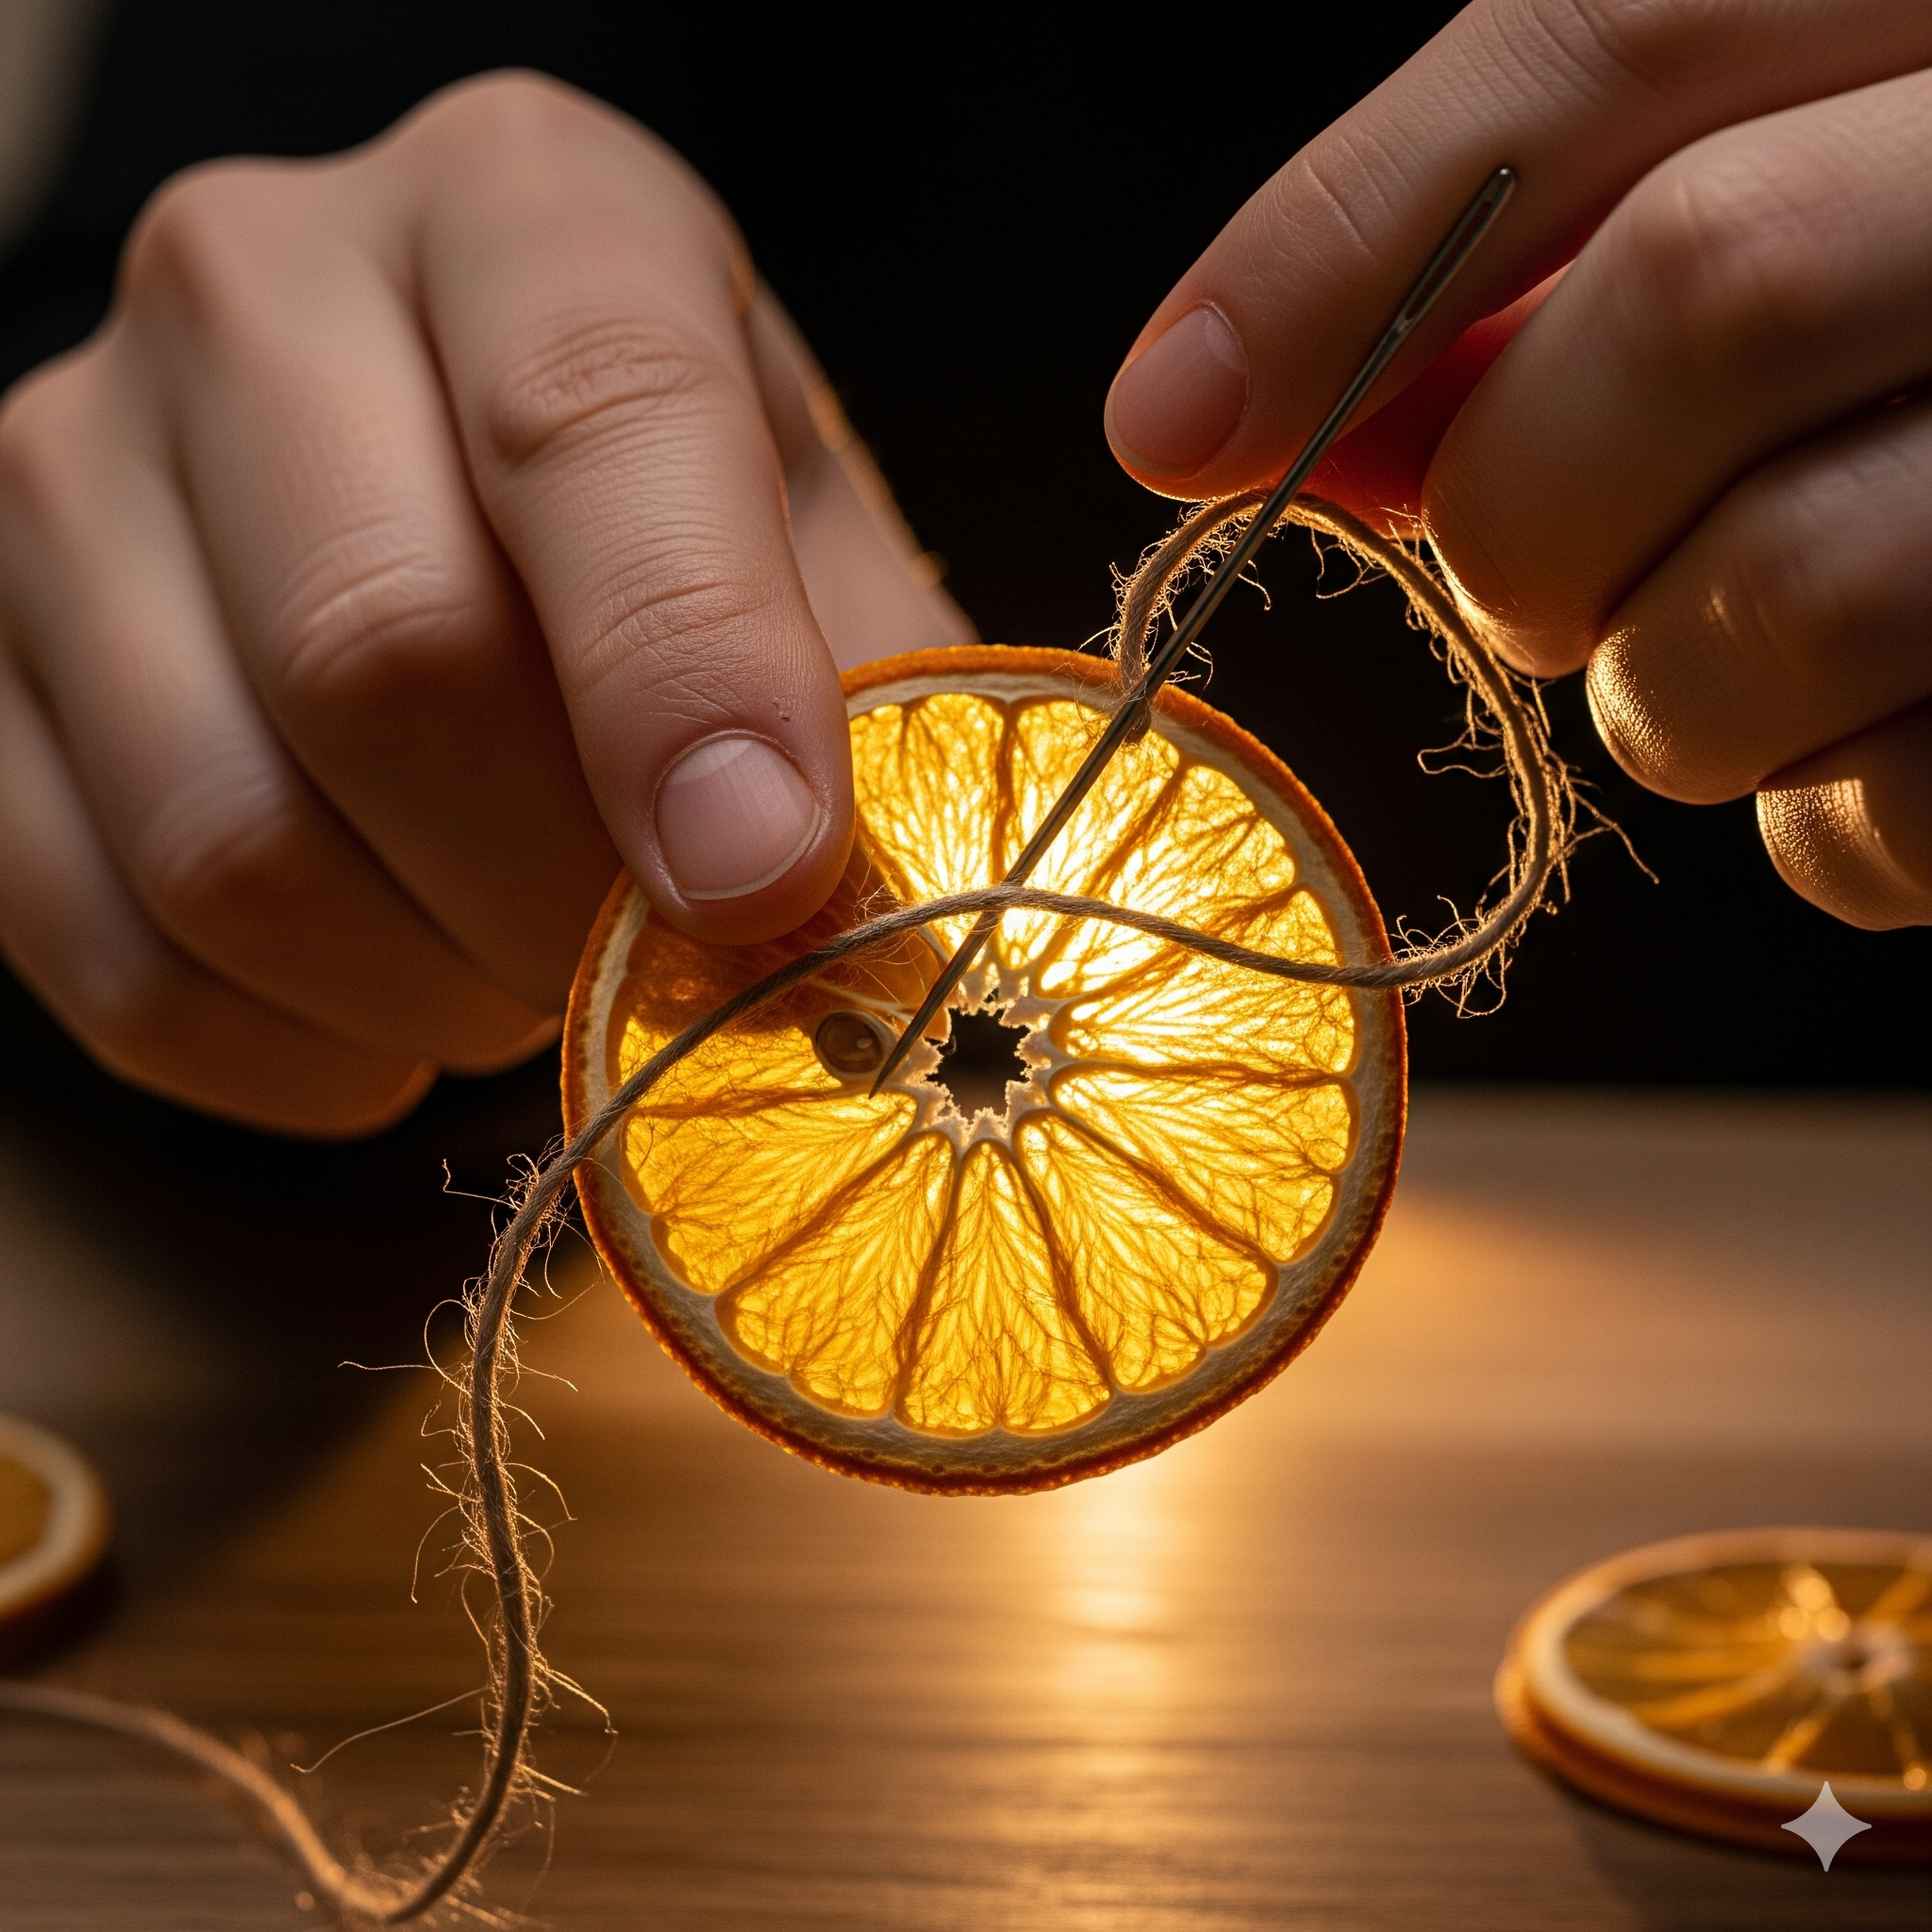
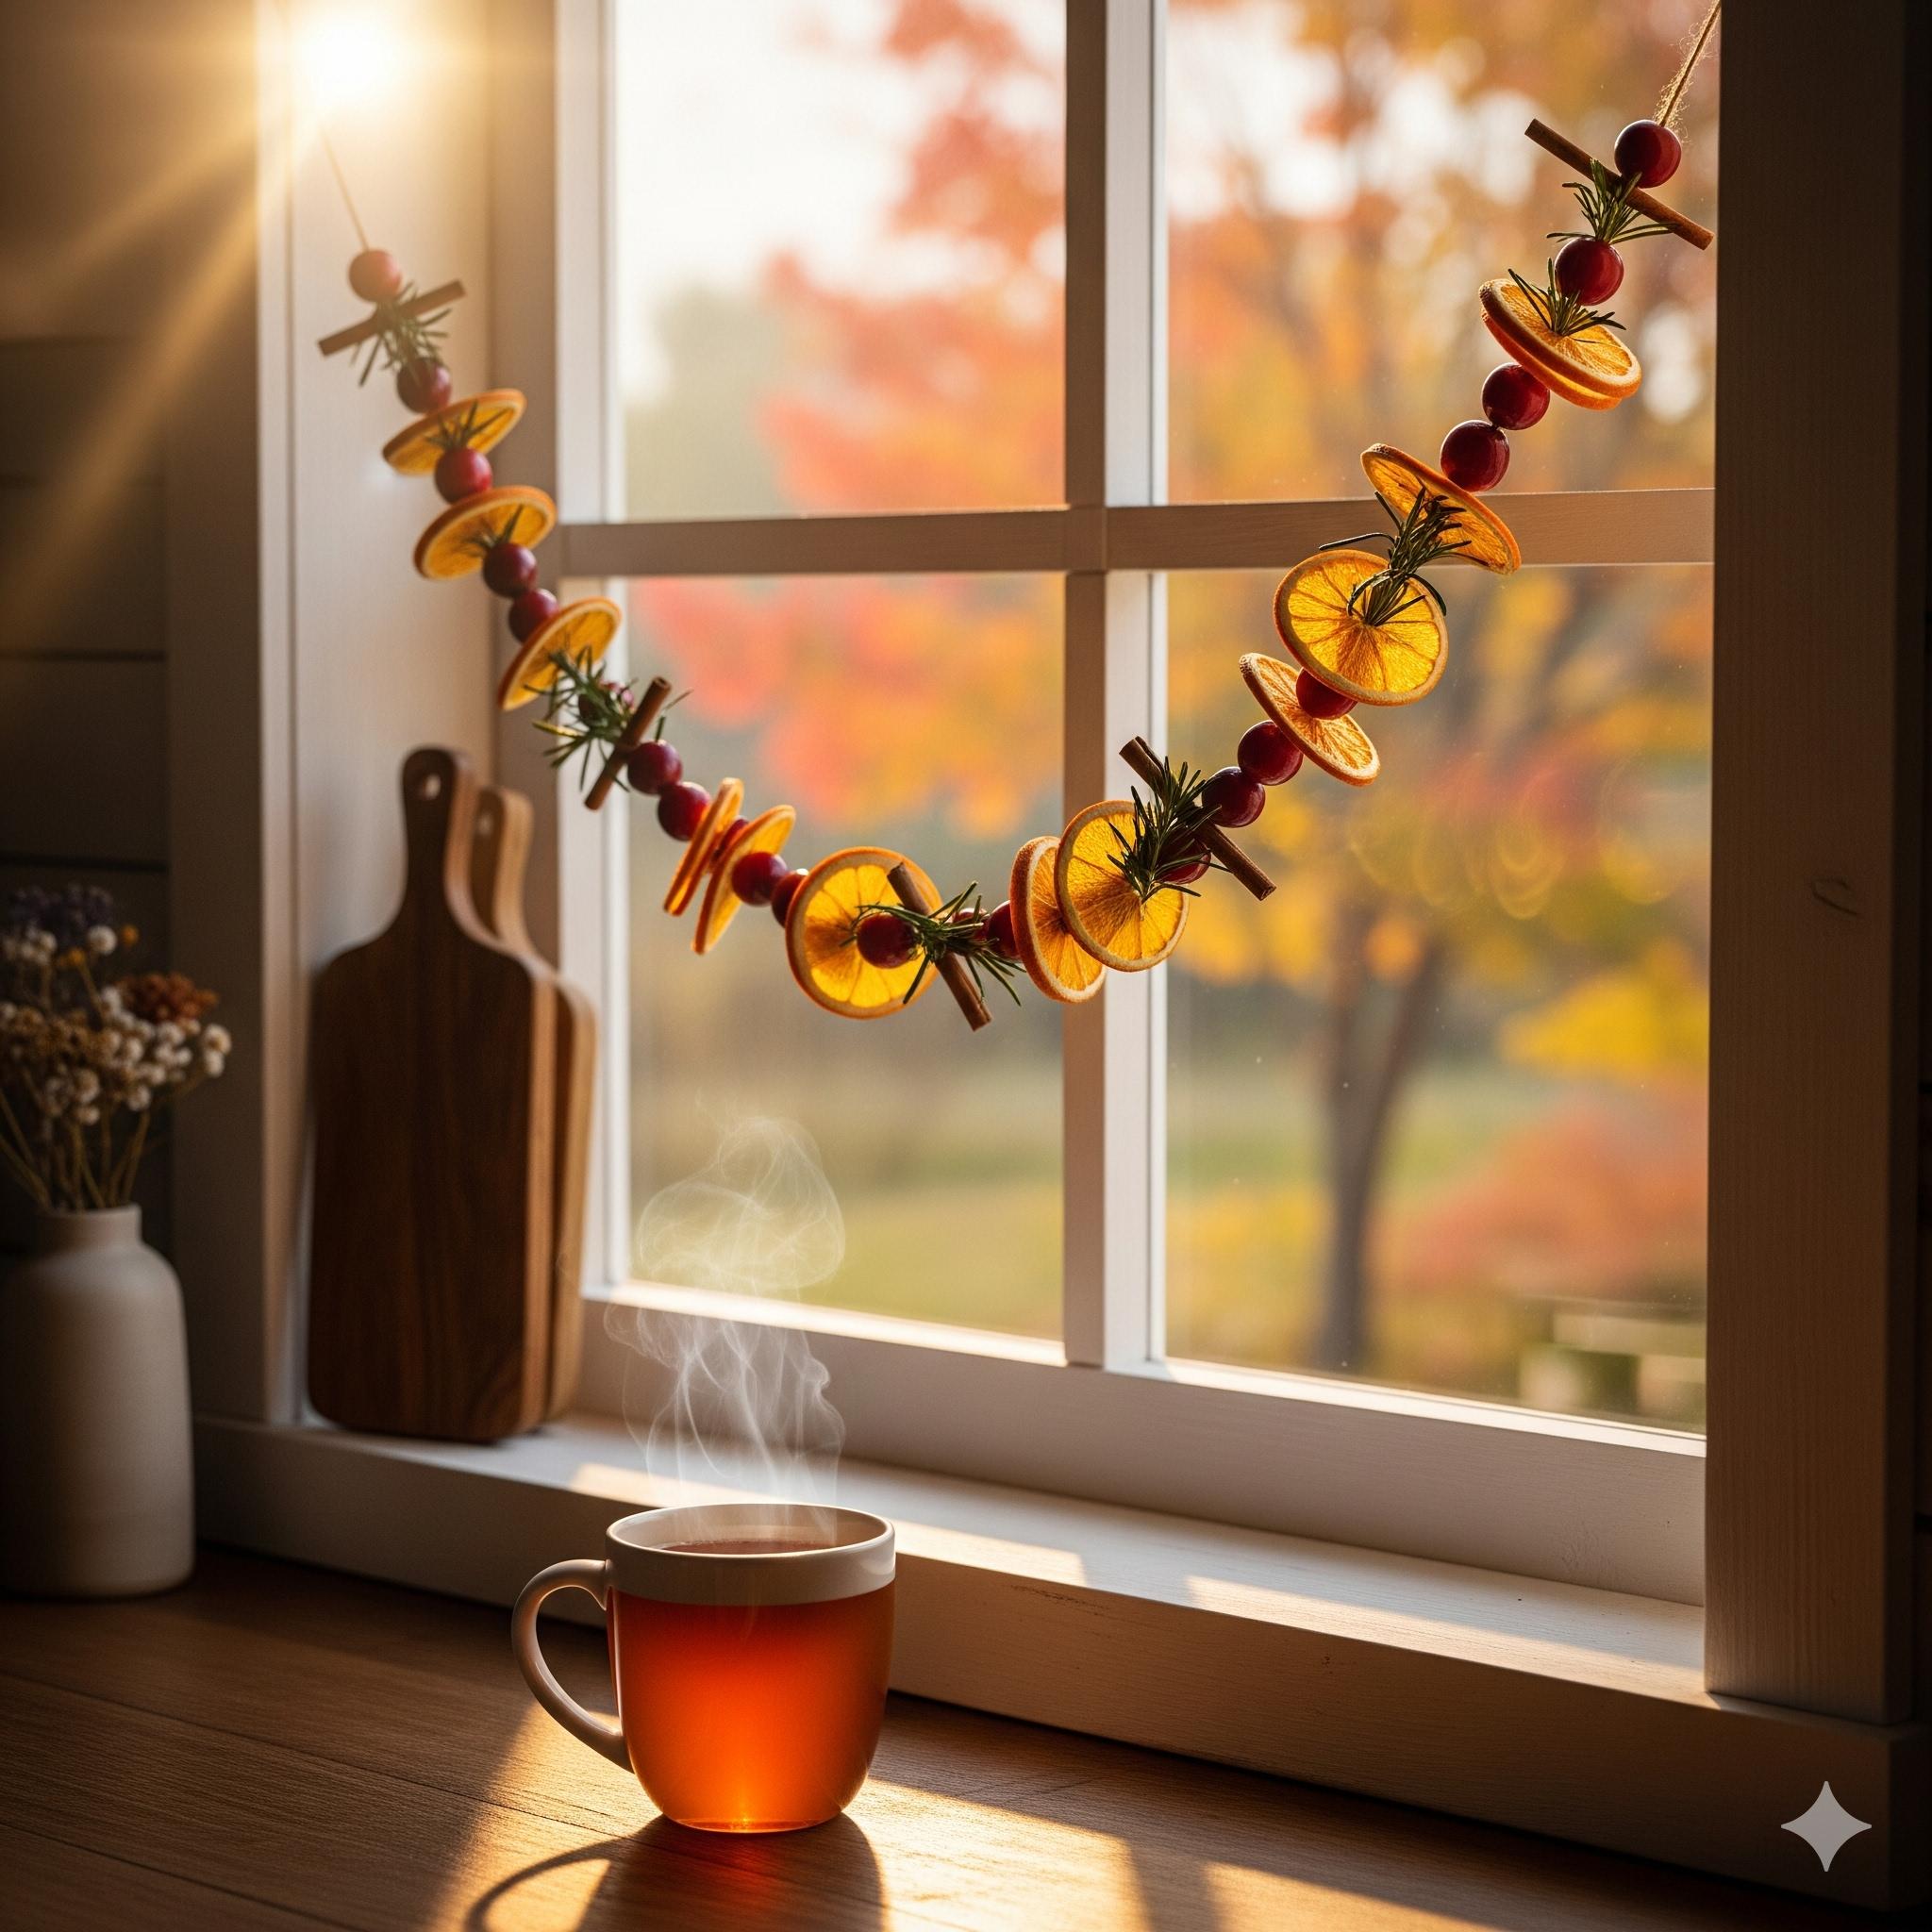
Step 3: String Your Beautiful Garland
Now for the fun part—seeing it all come together!
Cut a piece of twine to your desired length. Be sure to add an extra 12 inches to allow for knots and loops for hanging.
Thread the twine through the eye of your darning needle. If you don't have one, you can use a wooden skewer to poke a hole in the orange slices first and then carefully thread the twine through by hand.
Push the needle through the fleshy part of the orange slice, just below the rind. The rind itself is very tough, so piercing the flesh is much easier.
Continue adding slices, spacing them an inch or two apart, or whatever distance looks best to you. Tie a simple knot on the outside of the first and last slice to keep them from sliding off the ends.
Step 4: Customize and Embellish Your Creation
Your garland is beautiful as is, but adding a few extra elements can elevate it even further.
Here are a few ideas:
- Add Cranberries: Thread fresh cranberries between the orange slices for a classic pop of festive red.
- Incorporate Spices: Alternate orange slices with cinnamon sticks or star anise for extra texture and an incredible holiday scent.
- Go Green: Weave in a few dried bay leaves for a touch of rustic green.
- Use Wooden Beads: Add natural wooden beads between elements to give your garland a modern, Scandinavian feel.
It's time to get creative. Get the best deals for all your DIY projects.
Troubleshooting Common Issues
Encountering a little trouble? Here are solutions to the most common problems.
- "My orange slices are sticking to the pan!" This almost always means you skipped the parchment paper. Parchment is non-stick and is essential for this project. If they're still a bit sticky after cooling, they may need another 30 minutes in the oven.
- "My oranges turned dark brown or black." This is a sign that your oven temperature was too high. Unfortunately, there's no way to undo this. For your next batch, ensure your oven is at its lowest setting (200°F / 95°C or lower). Every oven is different, so an oven thermometer can be a great investment.
- "How do I store my garland?" To use your garland year after year, store it in an airtight container or a sealed plastic bag. Place a silica gel packet (the kind you find in shoe boxes) inside to absorb any moisture. Store it in a cool, dark, and dry place.
Your Home's New Favorite Fall Accent
That's all there is to it. You’ve successfully transformed a few simple oranges into a stunning, fragrant piece of decor that brings the natural beauty of autumn right into your home.
You didn't just make a craft; you created an atmosphere. This garland is perfect for draping over a mantelpiece, hanging in a window where it can catch the light, or weaving into a holiday tablescape.
Now go hang up your creation and enjoy the cozy, festive charm you've added to your space!
Frequently Asked Questions
When fully dried and stored properly in a cool, dry place, your garland can last for two to three years or even longer. The vibrant color may fade slightly over time, but it will still be beautiful.
Absolutely! Limes, lemons, and grapefruit all work wonderfully and create a beautiful multi-colored garland. Just be aware that smaller fruits like limes will dry much faster, so check on them more frequently.
This happens when the oven temperature is too high, causing the sugars in the fruit to burn. The key is to dehydrate, not cook. Use the lowest possible oven setting (around 200°F / 95°C) for that perfect, translucent glow.
The most important step is ensuring the slices are completely dry before you string and store them. If they feel even slightly sticky, they need more time in the oven. Storing them in an airtight container with a silica gel packet will also prevent any moisture issues.
When the orange slices are fully dehydrated, they contain no moisture to attract pests like fruit flies. As long as they are completely dry, you should not have any issues with bugs.