Grow Your Own Flavor: How to Build a Reclaimed Pallet Vertical Herb Garden (Even if You Have No Space!)
Learn how to build a DIY vertical herb garden from reclaimed pallets! Maximize space, save money & grow fresh herbs with this easy, sustainable guide. Get started!

Tired of store-bought herbs that wilt before you can use them all? Wish you had a vibrant, fragrant garden but only have a tiny balcony or a blank wall? You're not alone. Many aspiring green thumbs face the frustrating challenge of limited space. But what if I told you that fresh basil, mint, and rosemary are just a DIY project away, even if your "garden" is a patio corner?
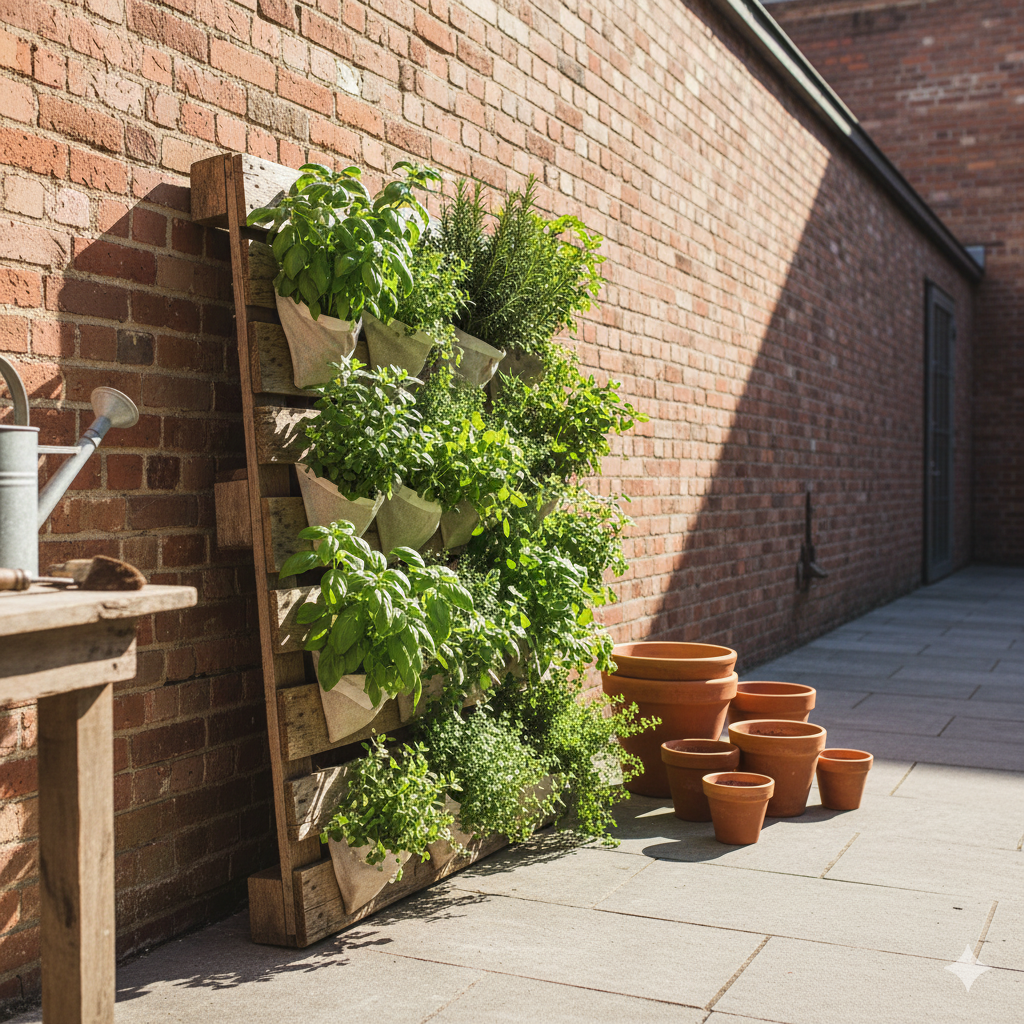
This guide will show you how to build a beautiful, functional, and surprisingly simple DIY vertical herb garden using reclaimed pallets. Yes, those sturdy wooden platforms often discarded behind businesses can become the backbone of your urban oasis. We're talking fresh ingredients at your fingertips, a stunning green focal point, and the satisfaction of a sustainable DIY win—all without breaking the bank or taking over your living room. Ready to transform neglected space into a vertical harvest? Let's dig in!
Transform Your Backyard with These Easy DIY Pallet Garden Ideas
"Enjoy this curated video. All rights and credit go to the original YouTube creator."
Why a Pallet Vertical Herb Garden is a Game-Changer
Before we grab our tools, let's quickly unpack why this project is a fantastic investment of your time:
- Maximizes Space: This is the ultimate solution for small spaces. Go vertical and grow more in less square footage.
- Eco-Friendly: Reclaiming pallets keeps them out of landfills and gives them a new, productive life. Plus, growing your own reduces packaging and transportation emissions.
- Budget-Friendly: Pallets are often free or very cheap, making this an incredibly economical gardening solution.
- Aesthetic Appeal: A well-designed vertical garden adds natural beauty and a unique rustic charm to any outdoor (or even indoor) space.
- Accessibility: Keeps your herbs at a comfortable height for tending and harvesting, reducing bending and kneeling.
- Fresh Herbs on Demand: Imagine stepping outside and snipping fresh cilantro or chives for dinner. Pure culinary bliss!
Important Safety Note: Sourcing Your Pallet
Not all pallets are created equal! It's crucial to choose safe pallets for gardening, especially for edibles. Look for pallets stamped with "HT" (Heat Treated). This means they were treated with heat to prevent pests, not harmful chemicals. AVOID pallets marked "MB" (Methyl Bromide), as this is a toxic pesticide. Also, steer clear of pallets that show signs of chemical spills, heavy stains, or strong odors.
Where to find HT pallets:
- Local businesses (hardware stores, feed stores, small manufacturing plants often discard them). Ask first!
- Online marketplaces (Craigslist, Facebook Marketplace often have "free pallet" listings).
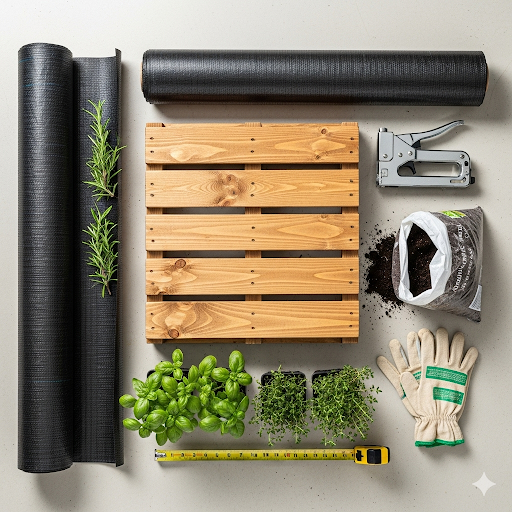
Materials & Tools You'll Need
Gathering everything upfront makes the building process smooth and enjoyable.
Shop now for the best prices in gardening at Walmart.
Materials:
| Item | Quantity | Notes |
| Heat-Treated (HT) Wooden Pallet | 1-2 | Depending on desired height. Ensure "HT" stamp. |
| Landscape Fabric | ~3-4 yards | Durable, allows drainage. |
| Staple Gun & Staples | 1 | Heavy-duty is best for wood. |
| Potting Mix | 1-2 bags | High-quality, well-draining mix for containers. |
| Herb Plants/Seeds | As desired | Start with small plants for quicker results (e.g., basil, mint, oregano, thyme, chives). |
| Heavy-duty Screws/Bolts | 4-6 | For mounting to a wall (if applicable). Ensure suitable for your wall type. |
| Washers | 4-6 | To secure mounting screws/bolts. |
| Optional: Exterior Wood Sealer | 1 can | For longevity and protection against weather. |
| Optional: Drainage layer | Small bag | Pebbles or broken pottery for bottom of pockets (improves drainage). |
Tools:
| Tool | Use |
| Saw (Hand saw, jigsaw, or circular saw) | For cutting pallet sections if modifying size. |
| Measuring Tape | For accurate measurements. |
| Utility Knife or Scissors | For cutting landscape fabric. |
| Drill & Drill Bits | For pre-drilling holes (if mounting) and attaching fabric. |
| Sandpaper/Sander | To smooth rough edges (optional, but recommended for aesthetics and safety). |
| Level | For ensuring your garden hangs straight (if mounting). |
| Gloves | To protect hands from splinters and dirt. |
| Safety Glasses | Essential for any cutting or drilling. |
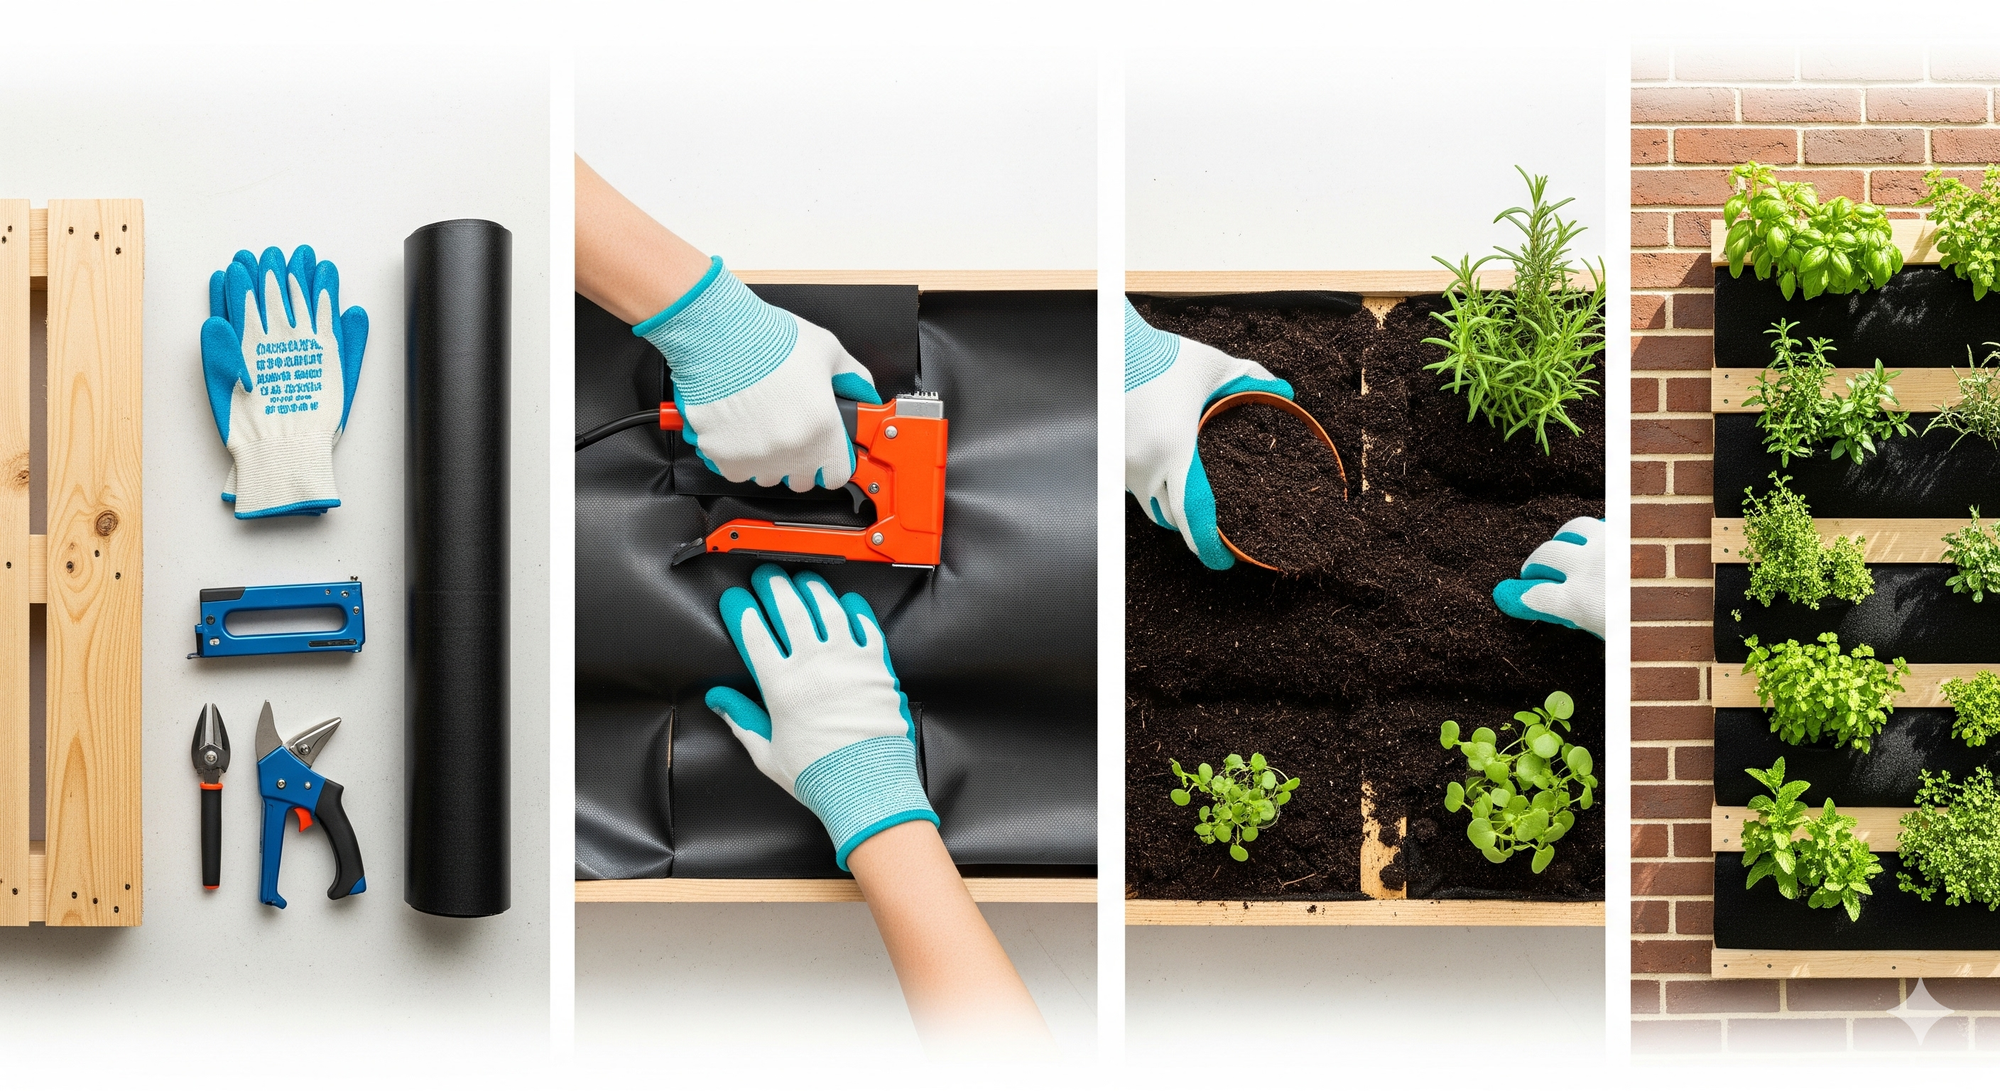
Step-by-Step Instructions: Building Your Pallet Herb Garden
Let's get that pallet transformed! This project can typically be completed in a single afternoon.
Step 1: Inspect and Prepare Your Pallet
First things first, a thorough check-up.
- Clean: Use a stiff brush and water to clean off any dirt, debris, or cobwebs. You can use a mild bleach solution (1 part bleach to 9 parts water) if you're concerned about mold, but rinse thoroughly afterwards. Let it dry completely in the sun.
- Sand (Optional, but Recommended): Use sandpaper or a power sander to smooth any rough edges or splinters. This makes handling safer and improves the final look.
- Remove Unnecessary Boards (Optional): If your pallet has too many gaps or boards that don't align with your vision for pockets, you can carefully pry them off with a pry bar. For a standard vertical garden, you'll primarily be using the existing structure.
Step 2: Configure Your Planting Pockets
This is where your pallet starts to take shape as a planter. Pallets naturally have gaps between the top and bottom slats. We'll be using these to create planting pockets.
- Identify Opening Sides: Lay your pallet flat. You'll notice that one side typically has a wider opening between the top and bottom deck boards. This will be the "front" of your planter. The other side will be the "back" that leans against a wall or stands.
- Create the Bottom of the Pockets: Along the bottom edge of each "shelf" (the gaps between the horizontal slats on the front), you need to create a base.
- Option A (Simplest): If your pallet is structured with a solid base slat running beneath each opening, you might not need to add anything. Just ensure there are no gaps for soil to fall through.
- Option B (Most Common): You'll need to create a "floor" for each pocket. Take one of the removed pallet slats (if you removed any) or purchase a thin piece of wood. Cut it to fit snugly across the bottom of the opening and screw it into place. This forms a shallow shelf.
- Option C (Landscape Fabric Pockets): This is often the easiest and most flexible method. Skip adding wooden shelves for now and proceed to Step 3, where we'll form fabric pockets.
Step 3: Line the Planting Pockets with Landscape Fabric
This step is critical for holding soil and allowing drainage.
- Cut Fabric: Unroll your landscape fabric. Measure the width of your pallet's "shelf" openings. You'll need pieces long enough to drape into each pocket, form a U-shape, and have enough overlap to staple securely. A good rule of thumb is to cut pieces roughly twice the depth of your pocket plus 6-8 inches for overlap.
- Form Pockets:
- Start at the top pocket. Push a piece of landscape fabric down into the opening, lining the bottom and sides.
- Bring the front edge of the fabric up over the front-facing wooden slat. Fold it over and staple it securely along the top edge of that slat.
- Reach inside the pocket and push the fabric firmly against the back wooden slat. Pull it taut, ensuring the bottom is flat. Staple the fabric securely to the back wooden slat, as close to the bottom as possible to maximize your pocket depth.
- Fold the side edges of the fabric into neat pleats or folds, stapling them firmly to the side support blocks of the pallet. Ensure there are no gaps for soil to escape.
- Repeat for all desired planting pockets. Ensure a snug fit for each.
Step 4: Add Drainage (Optional, but Recommended) and Potting Mix
Proper drainage is key to healthy herbs.
- Drainage Layer: If you're using pebbles or broken pottery, add a thin layer (about 1 inch) to the bottom of each landscape fabric pocket. This prevents soil from compacting and allows excess water to escape more easily.
- Fill with Potting Mix: Carefully fill each fabric-lined pocket with high-quality potting mix. Leave about 1-2 inches of space from the top edge of the fabric to prevent soil from washing out when watering. Don't compact the soil too much; you want it to be airy for root growth.
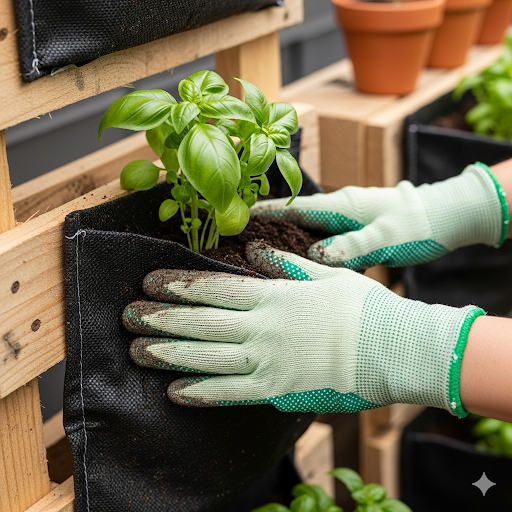
Step 5: Plant Your Herbs
Now for the fun part—bringing your garden to life!
- Choose Your Herbs: Select herbs that suit your climate and sunlight conditions. Consider:
- Full Sun (6+ hours): Basil, Rosemary, Thyme, Oregano, Sage, Lavender
- Partial Sun (4-6 hours): Mint, Cilantro, Parsley, Chives
- Arrange for Success: Consider the mature size of your plants. Taller herbs (like rosemary) might go in lower pockets, while sprawling ones (like mint) are excellent for upper pockets where they can cascade. Don't overcrowd the pockets.
- Planting:
- Dig a small hole in the potting mix.
- Gently remove your herb plant from its nursery pot.
- Loosen the roots slightly if they're tightly bound.
- Place the plant in the hole, ensuring the top of the root ball is level with the surrounding soil.
- Backfill with potting mix, gently patting around the base of the plant.
- Water thoroughly immediately after planting.
Step 6: Seal and Mount Your Vertical Garden
This final step ensures longevity and stability.
- Apply Wood Sealer (Recommended): If you haven't already, apply an exterior-grade wood sealer to the exposed wood of your pallet. This will protect it from moisture and prolong its life, especially if it's outdoors. Allow it to dry completely according to product instructions.
- Choose Your Location:
- Sunlight: Most herbs need at least 4-6 hours of direct sunlight.
- Stability: Choose a sturdy wall or fence if mounting.
- Accessibility: Ensure it's easy to reach for watering and harvesting.
- Mounting (If Applicable):
- Hold the pallet against the wall in your desired location. Use a level to ensure it's straight.
- Mark the locations for your screws/bolts, typically through the solid vertical support blocks of the pallet.
- Pre-drill pilot holes in both the pallet and the wall (if necessary, depending on wall material).
- Use heavy-duty screws or lag bolts with washers to securely fasten the pallet to the wall. Ensure it's firmly attached and won't wobble.
- Freestanding (Alternative): If you're not mounting it, simply lean the pallet against a sturdy wall. Ensure it's stable and won't tip over. You might place bricks or pavers at the base for added stability.
Watering and Care for Your Vertical Herb Garden
Your new DIY vertical herb garden will need regular care to thrive.
- Watering: Vertical gardens can dry out faster than in-ground gardens. Check the soil moisture daily. Water when the top inch of soil feels dry to the touch. Water gently, allowing water to drain through.
- Sunlight: Ensure your herbs are getting adequate sunlight (as per their individual needs). Rotate the garden if some plants are getting more sun than others, or if you're using it freestanding.
- Harvesting: Regularly snip off leaves and stems to encourage bushier growth. Don't take more than 1/3 of the plant at a time.
- Pest Control: Keep an eye out for pests. Use natural solutions like neem oil or insecticidal soap if needed.
- Fertilizing: Most herbs don't need heavy feeding. A diluted liquid fertilizer once a month during the growing season is usually sufficient.
Conclusion: Your Vertical Herb Oasis Awaits!
Congratulations! You've successfully transformed a humble pallet into a thriving, space-saving DIY vertical herb garden. Not only have you given reclaimed wood a new purpose, but you've also unlocked a world of fresh flavors for your culinary adventures.
This project is a testament to the power of creative DIY: solving a common problem (lack of space) with a sustainable, budget-friendly, and beautiful solution. So go ahead, snip that fresh rosemary for your roasted potatoes or muddle that mint for a refreshing drink. Your urban oasis is ready to deliver.
What herbs will you plant first in your new vertical garden? Share your success stories and photos with us!
Frequently Asked Questions
What kind of pallet is safe to use for a DIY herb garden?
Always look for pallets stamped with "HT" which means Heat Treated, indicating they were not treated with harmful chemicals. Avoid pallets marked "MB" (Methyl Bromide) and those with stains or strong odors.
How do I ensure my vertical herb garden drains properly?
Using landscape fabric to line the pockets is crucial, as it allows water to pass through while retaining soil. You can also add a thin layer of gravel or broken pottery at the bottom of each pocket before adding soil for enhanced drainage.
What are the best herbs to grow in a vertical garden?
Many herbs thrive in vertical setups. Popular choices include basil, mint, rosemary, thyme, oregano, chives, parsley, and cilantro. Consider their sunlight needs and mature size when arranging them.
Can I use my pallet herb garden indoors?
Yes, if you have a spot with sufficient sunlight (ideally near a south-facing window). Ensure proper drainage and consider placing a tray underneath to catch any excess water. Applying an interior-grade wood sealer is also recommended for indoor use.
How do I prevent my wooden pallet from rotting over time?
Cleaning and drying the pallet thoroughly before assembly is key. Applying an exterior-grade wood sealer or paint will significantly protect the wood from moisture and UV rays, extending the lifespan of your vertical garden.
Grow Your Best Garden Yet! Fresh possibilities are blooming at Walmart! Find everything you need for a thriving garden, from vibrant plants and quality seeds to essential tools and fertile soil. Shop Walmart for all your gardening essentials.